Tuesday, 13 November 2018

Celebrate

Hello friends!
Happy Wednesday!

Today I am representing a very simple but an attractive card with dimensions which can be used for any special occasion.
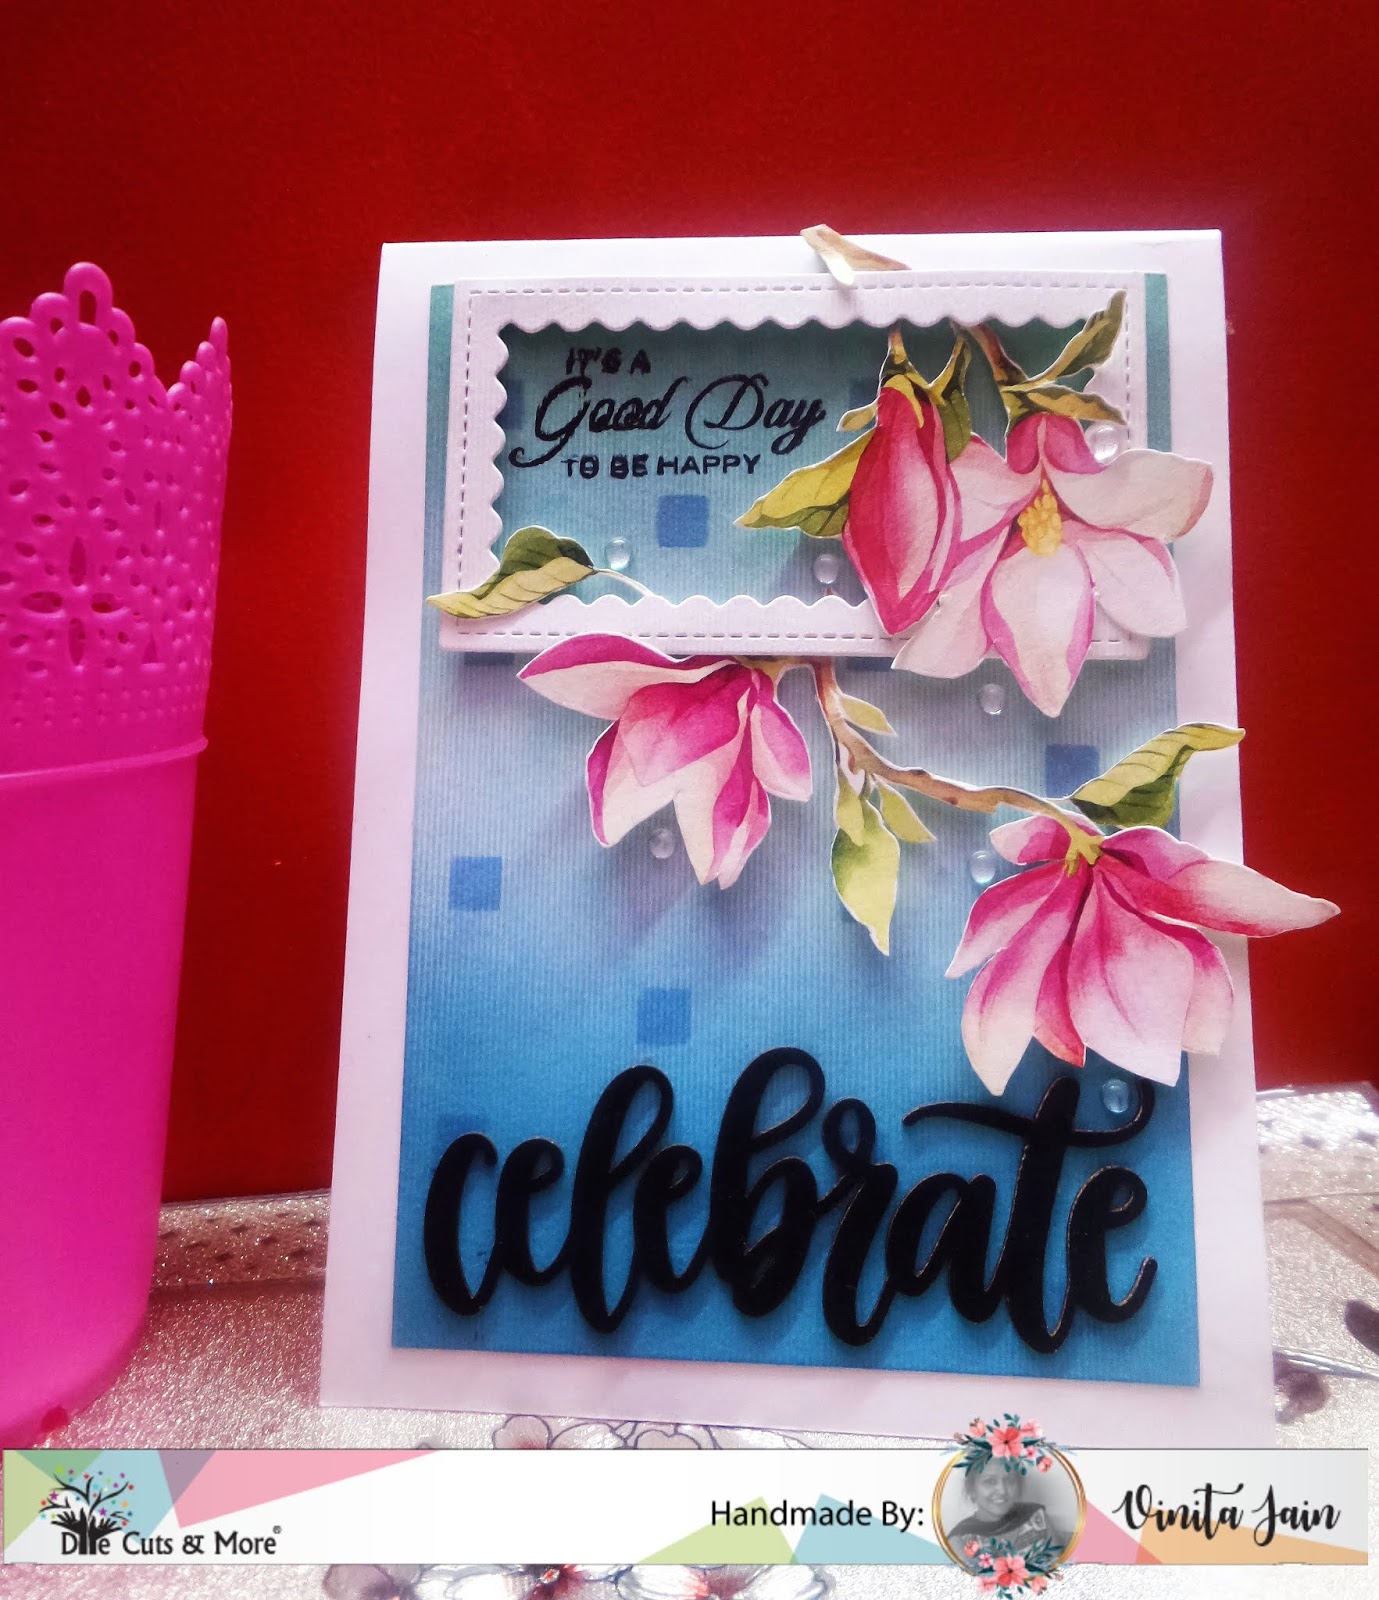


I started with blending some DI Mermaid lagoon and Cracked Pistachio on a textured white panel. Then using Box stencil created a pattern. Die cut an inverted scalloped rectangle frame in white. Fussy cut some Magnolia flowers from Magnolia Delight Critter Sheet.


Added a sentiment at the top corner on the blended panel. Adhered this panel on a white card base. Using adhesive foam dots, I adhered all the fussy cut flowers with a frame with a lot of dimensions.
Adhered that bold and beautiful Chiplet sentiment in black with some sparkling clear droplets.


Hoping you enjoyed this pretty creation!

Have a wonderful day!


Supply List

Cardstock: Textured white and fleece whit CS
Dies: Inverted Scallop Rectangle frames from DCAM
Stencil: Box Mae two-step stencil from DCAM
Chiplet: Celebrate word in black from DCAM
Droplets: Sparkling clear from DCAM
Stamp: sentiment is from Mudra's Fresh cut roses stamp set
Distress Inks: Cracked Pistachio and mermaid lagoon
Pop Dots

Would love to enter my card in the following challenges:

Friday, 2 November 2018

Clean and Simple

Hello to all!
Happy Friday!

Today's post is for Cut It Up Challenge inspiration DT post. The theme is clean and simple. And this time Cas-ual Fridays Stamps is an awesome sponsor!!
 I received such a beautiful stamp set in my DT kit from them.
I love the stamp set so much with such inspirational quotes!

Here is my take on the theme:


 My card goes with an inspirational photo and combined it with a sketch too!


I love the textures and woodgrain panel with autumn feel on it!

For the woodgrain effect, I pulled out of my woodgrain embossing folder and inked it. Then cut a strip of it highlighted it with some gold & copper perfect pearls. Filled the crystal clear glitter in the debossed area. Then for more textures cut another strip of a handmade textured paper.


Some solid butterflies were stamped and highlighted one of them using gold perfect pearl with subtle blending effect.
To highlight the sentiment die cut a tag out of a PP and foam mounted this tag on the panel.
In the end, dressed up it well with few gold gems.

Supply used

Cardstock: Heavy white CS
Pattern Paper: Woodgrain from Papericious
Handmade paper: Textured brown
Embossing folder: woodgrain from Daris
Stamp: Be from Cas-ual stamps
Die: Scallop Tags from Cas-ual Fri-dies
Memento: Rich Cocoa
Perfect pearls: Gold and copper
Jute string: Dark Brown and light brown from American crafts
Gems: gold color from my stash
Glitter: Nuvo crystal clear drops

Would love to enter this card in the following challenges:
https://butterflyspotchallenge.blogspot.com/2018/10/110-spin-butterfly-wheel-with-letter-g.html- I spin the butterfly with gold theme and gems with glitter effect


Thursday, 1 November 2018

Diwali card in Gatefold style!

Hello craft lovers!
Happy November!

Diwali is the most important festival celebrated by Hindus in India, the festival of lights will be celebrated on November 7th!

I made this beautiful Gatefold card in Indian Traditional style to celebrate this Diwali!


I started with stamping the Diya image, heat embossed in gold and colored with Zig brushes, fussy cut it!
My card base is white in color and I blended some different distress inks on all the panels.
Now stamped the borders and Paisley images, colored them.
Heat embossed the chip frame in gold. 


Inside Panel


I used the negative part too of the framed chippi and applied different acrylic colors with textures using a palette knife.
Now stamped the sentiments and Ganesha image and heat embossed in gold with borders too. Added  PP in both sides and at the back as well.
Embellished it with some gems, laces and tied it with a golden string with a flower.

Here are some close-up pics:


Supply list

Cardstock: White heavy CS
Pattern Paper: a Handmade sheet in orange
Stamps: Diya mini, Mehendika, Madhubani borders and Ganesha from Mudra stamps
Chipzeb: Elegant Frames from Mudra
Embossing Powder: Metallic gold-rich pale from Wow
Distress inks: Picked Raspberry, Abandoned coral, fossilized amber and carved pumpkin
Zig clean clear real brush markers
Acrylic colors: Yellow, orange, red, white and pink from Fevicryl
Pearl color: Gold color from Fevicryl
Crystal gems
Golden string, red flower and a colored golden lace as an embellishments

would love to enter my card into the following challenges:

Wednesday, 31 October 2018

Dream Big little one!

Hello everyone!
Happy Wednesday!

 A new card with Crescent Shape theme, an embossed background and inspired by the cutest song ever-Twinkle, twinkle little star!


First of all, I love this super cute image, a lil one is dreaming with his cute blanket, a bunny toy and sure steal my heart! So much fun to color this adorable lil one! This image made me totally Happy reminding all childhood imagination dreaming along with stars, under the moon!!! 
This card started with a white card base with stars embossing folder.
The sentiment is heat embossed in Black ebony EP along with colorful stamped stars on another textured watercolor white panel and some splatters for more interest and textures.
I added a strip of glimmer stars pattern from a foiled sheet.
I love the bright colors pops on this card!


I worked on Brustro textured watercolor paper brand to create this scene, it's my favorite brand to use with Zig clean color real brush markers. I stamped the image with jet black archival ink and colored it. Fussy cut it, outlined the edges with my black marker. Die cut a circle watercolored it with blue shades to fit this image along with moon to create the starry sky. I added some star sequins for an etra oomph factor along with a tiny twine bow.


An inside message:


Hoping you all enjoyed this cute card!

Have a wonderful day!

Supply List

Cardstock: Heavy white CS, Textured white sheet for watercoloring from Brustro Brand
Foiled glimmer sheet: Silver stars background
Stamp: Lil one from Mudra stamps
Dies: Nesting Rectangles from Tattered crafts; Nesting circles from WRMK
Embossing Folder: Stars from Itsy Bitsy
Embossing Powder: Black ebony from WOW
Zig Clean Color Real Brush Markers
Dye Inks: Jet Black, aqua blue, Magenta from Tubby Crafts
Sequins: Star shapes- golden and pink
Double shade twine
Adhesive foam dots: From Itsy Bitsy

Would love to enter my card in the following challenges:

Thursday, 25 October 2018

Elegant card and a beautiful decorated envelope!

Hello everyone!
Happy Thursday!

 Today I am showcasing easy-peasy but elegant projects. My DT post for DCAM blog!


Card


For this card, I did lots of fussy cutting and die cuts some frames first.


Created a watercolored panel with texture and splatters using acrylic paints in fall color theme and to match those fussy cut floral elements.


Now time to decorate your card. Added nuvo white crystal drops for more dimension to the abstract florals centre and all fussy cut elements. Fussy cut HUGS alphabets too carefully. Embellished it with some sequins.


Envelope

I created a festive feel envelop for Diwali. I decorated both sides of the envelope.
This is the front of the envelope


And this is the back side of the envelope.


Here is the full look of the envelope.


I started to make my own stencil pattern using 3D step pattern builder stencil. Fussy cut some floral elements from golden blue delight critter sheet. Die cut the last two smallest Margeurita flowers, distressed them, shaping them. Die cut some leaves from a brown textured sheet.
Die cut a pierced scallop border from a blue glitter sheet.
Now dressed up my envelope with all beautiful elements.


Hoping you all enjoyed today's projects!
Thanks again for taking the time to drop by!

Have a wonderful day!

Supply List


Cardstocks: White CS 30 gsm
Glitter sheet: Blue
Critter sheets: Abstract floral alphabets and golden blue delight from DCAM store
Dies: Inverted scallop rectangle frames die, leaves with Tendrils, wild grass, Margeurita flowers, 
Split envelop die, pierced scallop borders 2, lower case bold xl alphabets from DCAM store
Stencil: 3D step pattern builder stencil from DCAM store
Acrylic colors: Yellow, white, orange pink and blue from Fevicryl
Distress oxides: mermaid lagoon, squeezed lemonade
Pigment ink: Copper
Sequins: snow festival mix
Adhesive half pearls: White, crystal and brown
Nuvo crystal clear glitter

Would love to participate in the following challenges:
https://madewithlovencare.blogspot.com/2018/10/elegant-card-and-beautiful-decorated.html

Wednesday, 24 October 2018

Guest Designer post for STAMPlorations 2

Hello everyone!
Happy Wednesday!

 Back with Wonderful Wednesday Colouring inspirations with more projects and techniques as a Guest DT for Stamplorations. You can also have a chance to win  $15 coupon if you leave comments here and my fellow crafters GD's Renee and Gwendolyn blogs!

Let's see what I created this time!


Card#1

How one can not smile when looking at this bright sunshine card!

This card is featuring New Beginnings stamp set!


I started with Double Running stitch rectangle die in the medium size on a piece of watercolored sheet and stamped the image using clear embossing ink at the right bottom corner. Heat embossed in black ebony EP.  Firstly, I colored the raises of the sun using my Zig watercolor pens in the dual shade.


Next the sea in blue and then the hill parts in green hues. I love the beautiful two-colour family contrast on the image!


Now die cut one more panel in yellow color using the same die and adhered that focal panel to that one. Placed that panel on another white biggest dies cut panel with the tilted bottom. A few sunny splatters and sequins were added before mounted that panel. The sentiment is from the same set. Now place it on a yellow card base.

Supply list

Cardstocks: White, Mango yellow and cream yellow CS
Watercolor textured sheet
Stamp: New Beginnings from Stamplorations
Die: Double Running Stich Rectangles from Cutplorations
Embossing powder: Black ebony from Wow
ZIG clean clear Real brushes: Set of 12
Archival ink: Jet black
Sequins: Orange and yellow color sequins

Would love to enter this card in the following challenges:
https://happylittlestampers.blogspot.com/2018/10/hls-october-watercolour-challenge.html
http://justkeeponcreating.blogspot.com/2018/10/its-time-for-october-2018-link-up-at.html
https://de-egel.blogspot.com/2018/10/oktober-challenge-66.html


Card#2


Firstly I took a piece of textured watercolor sheet and die cut a panel using Double Running Stitch Rectangle die. Now dry embossed it with Merry Go Round stencil.


Next step is watercolored those embossed areas. I used my watercolor pencils from Faber Castell.
First I created my color palette on a watercolor sheet by rubbing the pencil shade in small circles. It's a heavy and thick watercolor sheet for surviving the whole process.
Now took my wet brush and load it up with pigments by activating the paint on the small circle.
And then I wet my area where I wanted to add the color and applied that color with a wet brush again. This way the color blend easily and quickly.
Here I used the shades of pinks as shown in the pic. This way you can create a really soft color hue.


Next using my Deer stencil, I mixed some glitter paste to the white embossing paste to tone down the color and applied it through my new Blue color stencil with a thick coat.


 I created my falling snow background. I used the Marvi Udicha snow pen. But when heat embossed the snow dots (due to more than 4 years old pen), it didn't work so well. So I used some fevicol on the tips of embossed dots and glittered the snow dust. Now I am quite happy with the result.


Die cut the Be Jolly word for the sentiment out of white, pink and white glitter sheets and made a stack.


Supply list

Cardstock: Textured white sheet
Glitter sheets: Magenta and silver
Die: Be Jolly from Cutplorations
Stencils: Merry go round and deer stencils from ARTplorations
Glitter paste: Silver from Bo Binny
Embossing paste: Textured white paste


Would love to enter this card in the following challenges:
http://crafterscastle.blogspot.com/2018/10/challenge-10-sept-winners.html
https://scrapsoflifebyscrappymo.blogspot.com/2018/10/october-rudolph-days-challenge.html
https://happylittlestampers.blogspot.com/2018/10/hls-october-christmas-challenge.html
http://justkeeponcreating.blogspot.com/2018/10/its-time-for-october-2018-link-up-at.html

Card#3


I started with stamping that pretty butterfly on a scrap of Navy blue sheet in clear embossing ink. Heat embossed it using metallic silver EP.


Fill the colors using my Polychromo Pencils as shown in the pic. Fussy cut it.


I wanted stained glass finishing touch to it, so added Dimensional Magic for 3D effect only on coloring parts.


Cut out a navy blue CS and dry embossed it with stitch rectangle die. Then stamped the same butterfly and partial die cut left the top part of the butterfly uncut.  Trimmed off the centre section for shaker elements.


Heat embossed the sentiment using metallic silver EP and filled the shaker sequins. Dressed it up with some sequins, fewgems and butterflies. Placed that fussy cut butterfly with dimension.


Would love to enter this card in the following challenges:
http://justkeeponcreating.blogspot.com/2018/10/its-time-for-october-2018-link-up-at.html


Hoping you all enjoyed the projects!

Thanks for stopping by!
Happy day!

Supply list:

Cardstocks: Navy blue CS,
Foam sheet:  white
Vellum sheet
Stamp: Trendy Butterflies 2 from Stamplorations
Die: Double Running Stich Rectangles from Cutplorations
Polychromo Pencils: Cream-102, Naples yellow-185, dark flesh-130, cinnamon-189, middle pithalo blue-152, pithalo blue-110, light cobalt turquoise154, light green-171silver-25
White gel pen
Sequins: Butterflies and blue colored sequins in different sizes and shades
Double-sided adhesive tape

Would love to enter this card in the following challenges:
https://happylittlestampers.blogspot.com/2018/10/hls-october-cas-challenge.html