Thursday, 28 January 2016

If you want to be happy Be!

Hi everyone!
                  Today, I am representing a mixed media creation. There is a new mini challenge started at https://www.facebook.com/More-Than-Words-Challenges and I love the concept and so much inspired by all talented designers work!!!
Here is my creation:
          For this creation, I want the vintage shabby look, so I chose brown and white color theme! I selected some vintage look papers and distressed them all around the edges, gessoed them. And randomly stamped some wall texture in jet black archival ink. I love new Sizzix mixed media die, it's so versatile and die cut my first mat layer.

I choose a tag from the same paper pack and clear gloss it 5 times and Wow, what a tremendous crackled layered I got and distressed it! Then on a piece of paper I stamped the sentiment in metallic look and clear embossed it.
I recently won a Follower goodie package from More than word challenge( thank you so much Valia for the awesome goodies) and I used one of the white clay ornate! I applied a heavy layer of gesso on it and then applied gold alcohol ink and some acrylic paints on it for shine. added some microbeads and adhere the sentiment.

 Made some handmade flowers from corrugated and texture sheet and some are gifted flowers, applied some gesso at the edges of flowers and arranged them on my mat.
 Before finalizing all the things, I also added a 1mm chipboard peeking from the die cut. Firstly I gesso it and applied some gelatos and then applied some crackle paste and randomly applied distress Vintage photo ink. And embellished it with some leaf charms, die cut leaves, swirls, sticker sentiment BE You, half gold pearls, pollens, a cream colored gorgeous ribbon bow and a butterfly.
 One more final look:
Hope you like this creation!

Supplies used:
Pink CS, Textured brown paper for flowers, chocolate  colored corrugated sheet, Enogreeting paper pack 12x12
Dies: Die-namics Mini and Large royal roses; Paper Smooches Loopy leaf(New in my stash); Sizzix Mixed media by Tim Holtz( New in my stash); 12 Flower frenzy from HOTP( New in my stash)
Stamps: Bo Bunny Wall to wall textures stamp; Fiskars All round quotes
Jet black Archival inks
Distress ink- Vintage photo
Distress crackle paint clear rock candy
Wow embossing powders; Metallic platinum and clear gloss
Lindsy Moon shadow mist
Adirondack mixative gold Alcohol ink
Gelatos- A14129
Glossy accent
Sakura Gesso
Ek success Distresser tool
Porta 3 D Antique stickers

I would like to enter my creation in the following challenges:
More Than Words - January 2016 Mini Challenge
http://morethanwordschallenge.blogspot.com/2016/01/january-2016-mini-challenge.html
http://craftyhazelnutspatternedpaper.blogspot.in/
http://dianamlarson.blogspot.in/2016/01/dlart-january-linky-challenge.html
http://nordsalten-hobbyklubb.blogspot.in/- Spring is my favorite season because I love the bright colors and smell of fresh flowers!
http://peek-a-boodesigns.blogspot.in/2016/01/challenge-2-any-thing-goes.html- I am inspired by saffron, white and green color

http://pennyblackatallsorts.blogspot.in/
http://www.simonsaysstampblog.com/wednesdaychallenge/#
http://sirstampalotchallenge.blogspot.in/2016/01/january-challenge-anything-goes-with.html
http://sweetstampinchallengeblog.blogspot.in/
http://wowembossingpowder.blogspot.in/
http://theartisticstampercreativeteam.blogspot.in/2016/01/january-2016-new-creative-challenge.html


Sunday, 17 January 2016

Valentine Garden Altered box in pink

Hello, everyone!
Happy Monday!

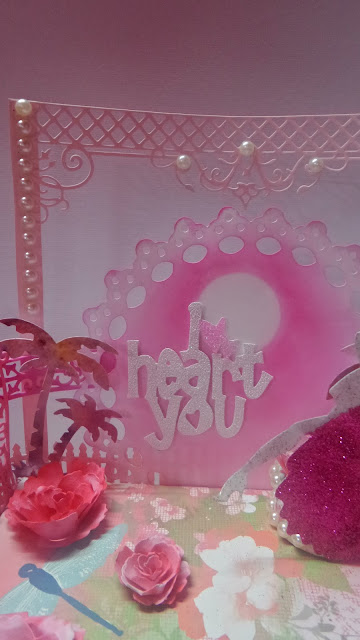
Now it's time to post for my GDT creation at Craftyscrappers and, this time, the theme is anything in pink. I altered a box and here it is:
Picture heavy post!
 I created a Valentine Garden scene on the lid of the box  for this cute couple for celebrating the Valentine Day! And I really excited and enjoyed while created it!!!

For this cute couple, I wanted to highlight her gown, so I glittered it and clear glossed( 4 times) the rest of the part with a very soft touch of glitter! And added the die cut a couple from the backside to a tealight!
I covered the whole box with pattern papers. Then attached a doily created a moonlight scene in pink, using the masking technique, distressed it. For the sentiment, heat embossed it with white sparkle embossing powder and hearts in pink.  Popped up the sentiment for dimension.
Then decorated the whole sides with foam Garden Gazebo(New) die cuts in pink, fences, color bursts BG paradise palms( New) using ink smooshing technique, a background Cheery Lynn border(New) and added some handmade flowers and embellished it with white pearls!

 Some tealight highlighted pictures.

And here is the inside which is also covered by pattern paper and silk fabric paper and you can store anything like jewellery  or it can be gifted also!


 Hope, you guys enjoyed this creation!!! And love to join the challenge at https://craftyscrappers.wordpress.com/ and enjoyed all other talented DT's creations!!!

Supplies used:
Diecuts from Craftyscrappers store: DC-VS-35( couple); DC-VS- 243( i heart you); DC-DL -05( doily)
Snippets of Pattern paper from Summer Blooms A4 paper pad; soft pink and dark pink colored foam sheets, Pink colored CS
Distress ink: Picked Raspberry
Ken Oliver's color bursts: Alizon crimson, orange, violet
Wow embossing powders: sparkling snow, magenta twinkle. clear gloss
Pink glitter from Martha Stewart
Dies: Garden Gazebo from die versions; Lattice Valance border from Cheery Lynn; Paradise palms from Spellbinders; Fence from Couture creations

I would love to enter my creation in the following challenges:
http://www.simonsaysstampblog.com/wednesdaychallenge/#
http://cheerylynndesigns.blogspot.in/
http://bunnyzoescrafts.blogspot.co.uk/2016/01/january-challenge-hearts.html
http://noordesign-uk.blogspot.co.uk/2016/01/challenge-14-anything-goes.html
http://liveandlovecrafts.blogspot.co.uk/2016/01/challenge-43-something-new.html
http://wowembossingpowder.blogspot.in/
http://dianamlarson.blogspot.in/2016/01/dlart-january-linky-challenge.html
http://fairytale-challengeblog.blogspot.in/2016/01/challenge-134-everything-goes.html
http://rheddscreativespirit.blogspot.co.uk/2016/01/january-2016-challenge.html
http://sweetstampsblog.blogspot.in/2016/01/januarys-anything-but-card-monthly.html


Thursday, 14 January 2016

Happy Hello!

Hey there!
This time, I made a super shaker card with all my new craft supplies as secret  Santa gifted to me on this New Year! And I am very much inspired from some sweet mood boards which are fit for my creation!


Here is my card:
      To create my card, I started with Neenah glossy white CS and some alcohol inks. I added few drops of different alcohol inks and blending it with the solution and see the fun result, so happy!
    Then I die cut two different shaped frames in front of it. Then die cut same frames from a designer foam sheet.  I embossed these two frames out of pattern paper and acetate sheet too and fussy cut them. Added the frames with shaker elements and dimensions. And adhered it on my white base card.
     To finish it off, I added a cute sentiment on a vellum banner using Staz on black ink and clear embossed it two times for more shine! Then added a cute butterfly and embellished it with liquid pearl!

Hope you enjoyed this creation!

Supplies used:
Neenah solar white glossy CS, Polka dot foam sheets, Acetate sheet, vellum sheet, Pink colored silk paper sheet, PP from sn@p life
Paper smooches Fancy frame icons die set and  Butterfly Duet
Alcohol inks- Dockside picnic set, sunset orange, sunshine yellow and Alcohol blending solution
Staz on jet black ink
Clear embossing powder from ranger
sentiment from Unity stamps
 White opal liquid pearl from rangers

I would love to enter my creation in the following challenges:
http://peek-a-boodesigns.blogspot.in/
http://papersmooches.blogspot.in/#
http://www.littletangles.blogspot.in/
http://sevenhillscrafts.blogspot.co.uk/p/blog-page.html - I chose the colors from 2nd palette
http://butterflyspotchallenge.blogspot.in/
http://kreativeinkauf-challenge.blogspot.de/2015/12/34-dezjan.html
http://dianamlarson.blogspot.in/2016/01/dlart-january-linky-challenge.html
http://fairytale-challengeblog.blogspot.in/
http://www.scrapyland-blog.com/
http://deepoceanchallengeblog.blogspot.in/
http://craftycardmakers.blogspot.in/
http://sirstampalotchallenge.blogspot.in/
http://wordartwednesday.blogspot.in/


Monday, 11 January 2016

Cupid love wall hanging!

Hello, friends!
                     This is my GDT post for  https://craftyscrappers.wordpress.com/! And the theme is "Cupid Love" where you need to use at least one thing showcasing cupid/ heart or wings. As I saw the image of cupid from my goodie bag from Konica Das, the owner of  Craftyscrappers. I imagined about the clouds, cupid, arrow and heart. And I got an idea of making a wall hanging with my favorite material felt. It is a dimensional wall hanging piece to decorate your walls or can be gifted to someone!
Here is a close up of the cutest image: 
I colored the image using my watercolor pencils, look at his shiny eyes and glittered cloud. Isn't he the cutest cupid on the cloud!!!
         To make something similar shown in the picture, you will need pink and white felt, a hand sewing needle, embroidery thread, and fiber fill or you can use cotton balls too.
         I cut  two pieces of pink colored felt  out of heart die. It has dash  around the edges to stitch, they give a nice faux stitched look to your projects. Then die cut two pieces each to create the clouds. Before stitching the big cloud, I created a cupid arrow out of a wood stick, adhered a pink thread around it, heat embossed the arrow for the snow effect. Now stitch along the edges leaving some little space to fill up the fibers and placed the arrow in between the clouds. I also attached a felt scalloped border around my cloud while stitching.
     I created fallen heart background using pink colored embossing paste on this cute cloud and before dying added some diamond glitter on it! The picture doesn't  justify the glittery look!  On the small cloud, I stamped the XOXO sentiment. Adhered the bigger scalloped die cut hearts using fabric glue. Now collect all the pieces and attached the ornament ring with the pink thread and add the finishing touches!!!
                                 And here is how it look in actions!
Hope you enjoyed this cute creation and inspired! Kindly join at https://craftyscrappers.wordpress.com/, You could be the lucky winner to win amazing prices!!!

First Winner: a clear stamp set along with crsft goodies
Second Winner: Rs. 500 worth die cuts and goodie
Third Winner: Rs. 400 worth die cuts and goodies

Supplies used:
Snippets of white and pink felt
fibre
Conversation bubble 4 cloud die; Nellie's multi frames heart die; Spellbinder Shapeabilities on the edge die
Cupid love stamping image by Konica L-32
xoxo sentiment from Waffleflower stamp
Archival black jet ink
multi-colored pink thread
Studio 45 texture embossing paste
Heidi Swapp stencil- 6x6 confetti
Diamond dust glitter
wow sprinkling snow embossing powder
half adhesive pearls
silver stoned ring, enamel hearts and crystal hearts

I would love to enter my creation in the following challenges:
http://bunnyzoescrafts.blogspot.in/2016/01/january-challenge-hearts.html
http://kreativeinkauf-challenge.blogspot.de/2015/12/34-dezjan.html
http://dianamlarson.blogspot.in/2016/01/dlart-january-linky-challenge.html
http://fairytale-challengeblog.blogspot.in/
http://littlescrappieces.blogspot.in/2016/01/show-it-off-saturday-linky-party-thanks.html
http://www.scrapyland-blog.com/
http://pixiescraftyworkshop.blogspot.in/

Monday, 4 January 2016

Happy New Year

Hello and happy Munday peeps!
                                                Wishing all of you a very Happy, Healthy, Creative & Prosperous New Year 2016! A big Thank you to all lovely crafters and my dear bloggy buddies who left sweet comments, support and encouraged me throughout the year! Welcome to all new followers!
                 I am pretty excited, it is 2016!  I am very much inspired by the word "Merry" at Casology and combined it with YNS color scheme!
                Today I want to share a CAS card with New Year message on it. I took a white base card and a snippet of the white textured sheet. I had heaps of fun doing a bit of water coloring on my card today.I wet the paper through mist water bottle and applied distress inks randomly  and again mists some little water on it. Heat dry it. Die cut the  NEW crystal snowflake out of it and one more flake from the other sheet. Some stitched holes at the bottom for a wonderful little detail. Then flicked some drops in blue and pearlized water with my brush. Now distressed the edges with my distresser tool and inked the edges.
               Adhered my panel on the base card. Inlaid the die cut piece. Now on the other one, I applied Versa mark ink and heat embossed it with  my New seafoam powder for the frosty look and added on the die cut. Added a silver thread and a gemstone in the centre for a little embellishment. And stamped the sentiment.
A closer look:
 Hope you enjoyed this creation!

supplies used;
White textured CS
 Ice crystal-Joy crafts; Stitching holes die from YNS
Sentiment from YNS-Winter home
Distress inks-stormy sky, scattered straw, barn door; Rich cocoa dye ink from Memento; Jet black archival ink
Wow opaque seafoam white embossing powder
perfect pearl-silver
WRMK distress tool

I would like to enter my creation in the following challenges:
http://casology.blogspot.in/2015/12/week-178-merry.html
YNScolor-29
http://yournextstamp.com/blog/category/challenge/
http://stampedblessings.com/
http://sirstampalotchallenge.blogspot.in/
http://allsortschallenge.blogspot.in/
http://bunnyzoescrafts.blogspot.co.uk/2015/11/novemberdecember-challenge-sparkle.html
http://cardmaniachallenges.blogspot.in/
http://deepoceanchallengeblog.blogspot.in/
http://kreativeinkauf-challenge.blogspot.in/
http://diesruschallenge.blogspot.in/
http://dianamlarson.blogspot.in/2015/12/dlart-thankful-thursday-challenge-171_31.html
http://dianamlarson.blogspot.in/2016/01/dlart-january-linky-challenge.html
http://blog.dreamtimecraftsupplies.com.au/2016/01/show-us-saturday-1.html
http://drsdesignsblog.blogspot.in/
http://littlescrappieces.blogspot.in/
http://modsquadchallenge.blogspot.in/
http://nordsalten-hobbyklubb.blogspot.in/
http://pixiescraftyworkshop.blogspot.in/
http://noordesign-uk.blogspot.nl/