Showing posts with label shimmery. Show all posts

Friday, 14 January 2022

Winter house

 Hi and welcome!

Happy Saturday!

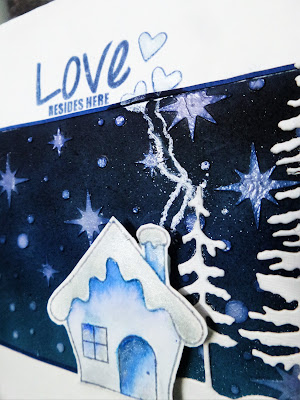
Today's card is inspired by a winter night scene with a new loving home.

https://christmas-craft-creations.blogspot.com/2022/02/winners-post-january-stencilling.html

The cute house is so adorable and really stand out against the winter snow stencilling background.
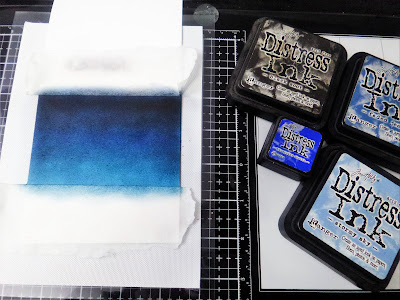
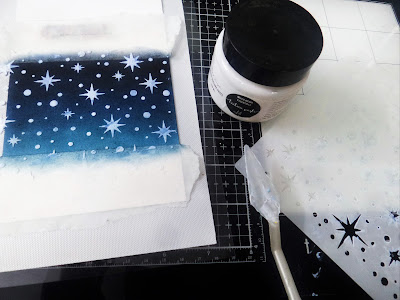
 For the background, I started by masking the area and blended some distress inks. I applied some embossing paste using a stencil. For the house, I stamped it in archival ink and watercolored it.
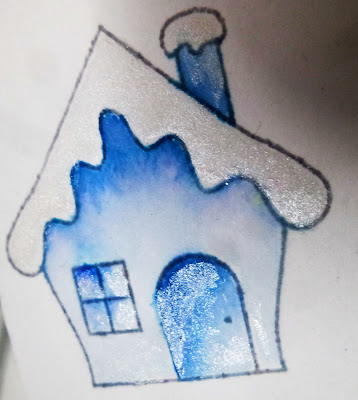
 The windows and snow on the house were coated with some liquid shimmer watercolor to add a bit of shimmer which is a really pretty soft silvery-pearl look. Die-cut some trees and added that house with foam tape with some Smoke hearts. Added a very thin strip of navy blue CS stripe on both sides.
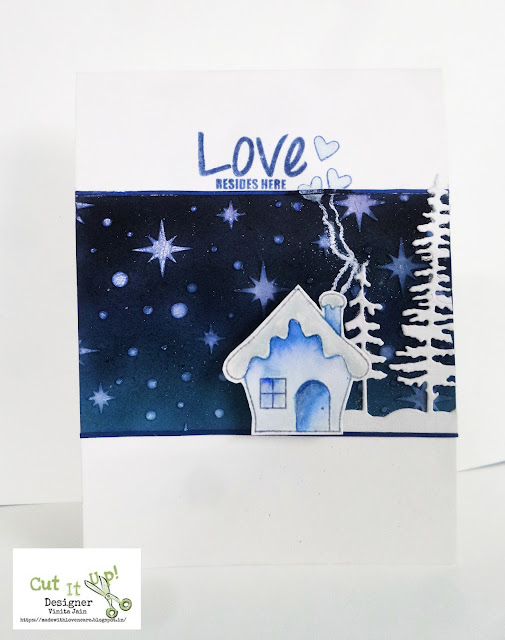
The sentiment is from another stamp set and fits nicely in the available space.

Hope you enjoyed it!

Happy crafting!

Supply List

Cardstocks: whisper white and navy blue CS

Stamps: House image-You make my heart spin set from MFT stamps; sentiment is from In This House stamp set - Technique Tuesday

Stencil: star-field stencil from Newton's Nook

Dies: Winter trees from Crafters Corner

Distress inks: tumbled glass, stormy sky, faded jeans, blueprint sketch, black soot

Archival ink: shadow grey

ZIG watercolor brushes

Liquid shimmer watercolor: shooting star from CrafTangles

Tonic studio Glass Media Mat from CrafTangles

Texture paste: white from CrafTangles

Would love to join these fun challenges:

http://sirstampalotchallenge.blogspot.com/2022/01/january-ag-with-stamping-and-option-add.html

https://allsortschallenge.blogspot.com/2022/01/week-659-add-heart.html

https://christmas-craft-creations.blogspot.com/2022/01/january-challenge-stencilling.html



Friday, 24 December 2021

Blingtastic snowflake on Christmas eve!

Hello friends!

Happy Friday and Merry Christmas eve!!!

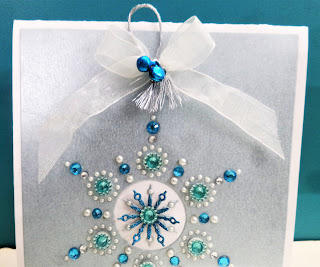
On this Christmas eve, I made a fun, elegant and easy jewelled snowflake card using a beautiful snowflake die, a perfect focal point!

 My card is inspired by a Create a Smile mood board!


I took a piece of metallic pearl shimmer CS in baby blue and die a snowflake, just so pretty.
Then I adhered that panel to the white card base.
Using my tweezer I placed each individual pearls and rhinestones....... the tiniest white pearl took a little extra time:). Just beautiful!

A closer view with tiny details:


Embellished it with a white shimmery ribbon bow along with a silver string and some turquoise anklet bells.


I heat embossed the sentiment in the same tone of baby blue pearl sheet with blue pearl EP for tone on tone effect.


Perfect little details on the snowflake! What do you all think? I love the way my Christmas snowflake look now!
Happy and merry day!

Supply list
Cardstock: Glossy white CS from Crafters Corner store
 Metallic Pearl Shimmer CS: Baby blue from DCAM store
Glitter sheet: turquoise blue
Die: Cool cuts Negative Snowflake die from Create a Smile 
Stamp: Snowy/ Holiday set from Winnie & Walter
Adhesive Rhinestones and half pearls: white pearls in different sizes and turquoise blings in different sizes from my stash
Anklet Bells: Turquoise color pack from  Itsy Bitsy store
White Shimmery ribbon from my stash
Silver string from Crafters Corner store

Would love to join these fun challenges:
https://createasmilestamps.blogspot.com/2021/12/we-dare-you-to-create-smile-december_01235051424.html- I am inspired by cool blue color, snowflakes, ribbon bow and some blings


Sunday, 14 November 2021

Slimline shimmery coffee card!

Hello to all!

Happy Sunday!

A fun project playing with alcohol inks technique for this beautiful centre burst die and teacup die!

I have a pretty Trinity Stamps Ambassador Inspiration Project on my Blog this morning featuring a fun Teacup die with every order! I have created a slimline shimmery card!


On a scrap of silver color glitter sheet, I applied some alcohol inks.  I blend them with alcohol ink solution and the magic begins. It turns out so well love the results!


Using centre burst die I separated the sunrays pieces.


Now on a slimline card base, I added those alcohol inked parts and some holographic pieces to use the same die.


Die-cut a teacup die from a scrap of white CS, holographic sheet and alcohol inked pieces. The heart is from a vellum sheet. 


Now placed my heart on the center of the sunrays. Adhered the teacup pieces on it. Stamped the sentiment on a banner.


Embellished it with some Fortune Teller mixatives, isn't it so pretty!

Happy crafting!

Trinity Stamps Products:
Teacup die
Stand Alone Die: Slimline Center Burst Die 
Embellishment Mix: Fortune Teller

Other Products:
Cardstock: Whisper white
Dot Holographic CS: DCAM store
Glitter sheet: silver from Little Birdie Glitz Pastels stack
Vellum sheet
Stamp: Latte Love stamp set from Fiskars
Die: Hearts from Nellie's Nest
Ranger Alcohol blending solution
Alcohol inks: Sunset orange, pebble, Mixative silver from rangers; hickory from Beyond inks
Distress Ink: espresso

Would love to join these fun challenges:
http://cardztv.blogspot.com/2021/11/cardz-tv-anything-goes-challenge-153.html


Monday, 25 October 2021

Playful kittens!

Hello everyone!

Happy Monday!

Today my card featured some tiny fun playful kittens with a dotted cover plate die. 

Janis is hosting the 7th Annual Cat Lovers Hop 2021. 

I am glad to participate this year! But I am going out for the next 2 days, so will come back after 2 days with more of my cat projects.


I started with a dotted cover plate die out of white CS, holographic sheet and white foam sheet.
On my card base, I placed one of the white dotted dies and marked some circles using a pencil.


Now I blended some DI using a blender on these circles and rub circle marks. Added some water droplets on the blended circles.


Now filled some of the dotted shakers in two colors, placed my cats and placed a transparent sheet on it and adhered my holographic panel on it.


In the end, I placed a die-cut sentiment out of a glitter sheet.

Look at these playful kittens, sp magical! Aren't they so cute!

Happy crafting!

Supply list

Cardstock: Whisper White CS

Holographic Sheet: Dotted from DCAM store

Glitter Cardstock: Brights from Little Birdie

Transparent sheet: OHP pack of 10 sheets from Itsy Bitsy store

Dies: Dotty from Itsy Bitsy store; Baby kittens from Poppy stamps; Celebrate from Peek-a-boo stamps

Distress Inks: fossilized amber, twisted citron, fired brick, mermaid lagoon 

Dotted shakers: Light blue and yellow from my stash

Would love to join these fun challenges:

https://herpeacefulgarden.blogspot.com/2021/10/main-hop-page-2021-cat-lovers-hop.html

https://mijnhobbyhonkchallenges.blogspot.com/2021/10/mhh-challenge-36-2-4-6.html- 2 shaker dotted elements blue and yellow color, 4 distress inks, 6 cats

http://alessandrasangels.blogspot.com/2021/10/challenge-51-and-winner-of-challenge-50.html

http://wordartwednesday.blogspot.com/2021/10/weeks-513-514-anything-goes.html

https://poppystamps.typepad.com/poppystamps/2021/10/psc85-make-it-magical.html


Wednesday, 12 August 2020

Sending Birthday Wishes

Hello, everyone!
Happy Thursday!

In love with these pretty array blooms, so delicate and fancy and I think the best way to showcasing them layering with striped and polka dots paper!


I used a stitched rectangle die for a striped PP. 
Then die cut these array blooms 2 times from black scrap sheet and 4 times out of a white scrap sheet.
Now it was delighted to color the internal die-cut pieces with my distress markers. Colored directly and blending them with a little water brush pen and adhered those pieces on one another and adjusted the pattern according to my requirement.
Then I die cut a double stitched circle from the centre out of my striped panel.
I added a dotted green PP on my white card base. Stamped the sentiment using my Misti. 


Now adhered that striped panel using foam tape.
 Arranged the floral array at the top of the circle corner with dimension.


Accented with few sequins, half pearls and shimmer in the centre of the flowers.

Thanks for stopping by!
Happy crafting!

Supply List
Cardstocks: Whisper white and black CS
Pattern Papers: Monochrome from Papericious and Dotted sheet from my stash
Dies: Adorable Array from Paper Smooches; double-stitched  rectangles and circles from Peekaboo designs
Stamp: Sentiment is from We adore you stamp set Paper Smooches
Dye ink: Black licorice from Lawn fawn
Distress Markers: Picked raspberry, mowed lawn
Nuvo Crystal Drops: white Bizzard
Misti
Foam tape, the small green half pearl and sequins from my stash

Would love to support these challenges:
http://timeoutchallenges.blogspot.com/2020/08/challenge-168.html- I am inspired by the pink flowers, stripes on the flip flop, luscious greenery


Thursday, 9 July 2020

Wishing you showers of joy!

Hello friends!
Happy Thursday!

Who wouldn't have a brighter day if these little fellas appeared in their mailbox to celebrate their Birthday!
I have made a card with masking technique featuring What's up duck stamp!
I come up with this cute scene! Isn't the Froggie is so cute, a perfect companion to the duck.


My Achievements


So the first thing I did was sit down and color my images with ZIG markers.


I masked my focus panel from both the side using a masking sheet.
For this one layer card, I made my own stencil using puffy clouds. I began by positioning onto my card base. I masked it off so that only the portion of stencil would be used. Then ink blended through that portion with. Few little raindrops added the final touch using a stencil and sparkle paste.


I stamped the sentiment and heat embossed it with silver metallic EP.  


Added puddle water image for my frog using DI. Added some splatters in white.


Finally, I added my cute duck and a little frog to the scene.
 Hope this brings a smile on your face with some showers of joy!

An inside view:


Happy crafting!

Supply List
Cardstock: Snippet of whisper white CS
Masking Sheets: Mudra stamps
Stamp: What's up duck from Crafyscrappers
Stencil: Raindrops from Craftangles
Die: Puffy cloud borders from Lawn Fawn
Embossing Powder: Metallic silver from WOW
Archival Ink: Jet Black
Distress Inks: chipped sapphire and mermaid lagoon
Sparkle paste: Whipped cream from Itsy Bitsy
ZIG Real watercolor brushes: a set of 12

Would love to enter in these fun challenges:
 
https://virginialusblog.blogspot.com/2020/07/julys-show-share.html- These days, I am obsessed with one layer CAS cards with one-third option only, a new technique to me!
craft challenge July 2020
http://timeoutchallenges.blogspot.com/2020/07/challenge-165.html remembering the childhood days when we enjoyed in a rainy season wearing boots and playing with boats in the floating water!