Showing posts with label Trinity Stamps. Show all posts

Saturday, 18 December 2021

Winter scene on Kraft!

Hello to all!

Happy Sunday!

Imagine, just a week left to celebrate Christmas!

Yayyy! In Top 3!

https://allsortschallenge.blogspot.com/2021/12/good-afternoon-to-you-all-we-hope-you.html

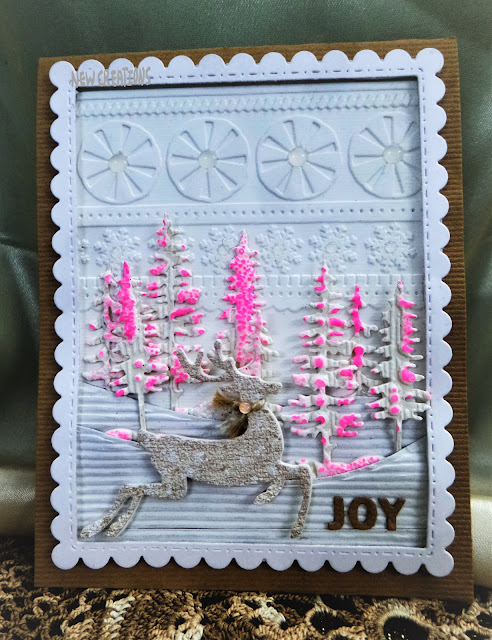
Here I made another card with lots of white and vintage feel on it with some pink Christmas trees and a cute reindeer!


For the winter scene background, I started with a Kraft card base. Embossed a white panel. Die-cut some rectangle scalloped frame, some corrugated winter hills. 


Die-cut a reindeer from a snippet of the textured light brown sheet.


Now created the whole background of the winter scene. Die-cut some Christmas trees from the snippets of an embossed white sheet. and inked some raised parts with neon pink ink.


Added the letters JOY.


Tied a jute twine as a muffler to the reindeer neck.


Embellished it with some semi-transparent iridescent baubles.


Some more pics:


Something different from my style. Hope you all like it!

Enjoy your day and keep crafting!

Supply List

Cardstocks: Kraft textured CS, Smooth white CS, Coconut white CS

Textured sheets: White corrugated sheet, light brown textured sheet, an embossed sheet in white from my stash

Embossing Folder: Swirls and ribbon set from Sizzix

Dies: Winter trees and Reindeer from Dress my craft store; Nested rectangles from Tattered lace; scalloped stitched rectangles from Gina Marie designs; Borders 1 from paper smooches; JOY word- Holiday Tiles cutaways from Winnie & Walter

Neon Ink: Pink

Embellishment: Fortune teller from Trinity Stamps

Glossy accents

Jute twine

Would love to join these fun challenges:

https://letssquashit.blogspot.com/2021/12/challenge-15-any-embossing-folder-any.html


Sunday, 14 November 2021

Slimline shimmery coffee card!

Hello to all!

Happy Sunday!

A fun project playing with alcohol inks technique for this beautiful centre burst die and teacup die!

I have a pretty Trinity Stamps Ambassador Inspiration Project on my Blog this morning featuring a fun Teacup die with every order! I have created a slimline shimmery card!


On a scrap of silver color glitter sheet, I applied some alcohol inks.  I blend them with alcohol ink solution and the magic begins. It turns out so well love the results!


Using centre burst die I separated the sunrays pieces.


Now on a slimline card base, I added those alcohol inked parts and some holographic pieces to use the same die.


Die-cut a teacup die from a scrap of white CS, holographic sheet and alcohol inked pieces. The heart is from a vellum sheet. 


Now placed my heart on the center of the sunrays. Adhered the teacup pieces on it. Stamped the sentiment on a banner.


Embellished it with some Fortune Teller mixatives, isn't it so pretty!

Happy crafting!

Trinity Stamps Products:
Teacup die
Stand Alone Die: Slimline Center Burst Die 
Embellishment Mix: Fortune Teller

Other Products:
Cardstock: Whisper white
Dot Holographic CS: DCAM store
Glitter sheet: silver from Little Birdie Glitz Pastels stack
Vellum sheet
Stamp: Latte Love stamp set from Fiskars
Die: Hearts from Nellie's Nest
Ranger Alcohol blending solution
Alcohol inks: Sunset orange, pebble, Mixative silver from rangers; hickory from Beyond inks
Distress Ink: espresso

Would love to join these fun challenges:
http://cardztv.blogspot.com/2021/11/cardz-tv-anything-goes-challenge-153.html


Monday, 8 November 2021

Merry and Bright

Hello to all!

First I die cut the Centre Burst die out of black CS and used the outline part as a stencil. I placed this stencil on my glossy white sheet. Created a distressed ink background in pink hues by squirting victorian velvet and pink raspberry inks onto my craft sheet and blending them. Then added some water droplets.


After drying added some white splatters.


 I once again die cut my center burst die out of raspberry pink glitter sheet. 


 Placed that outlined piece dies on my stencilled background as shown in the pic. Cut the extra part outside of the panel.

Added that panel to white CS base.


The sentiment is so perfect for the Christmassy feel on it! 
The glitter outlined die .........really made the sun rays sparkle. In the end, tied up a twine around my white panel with a bow. And added some Embellishments.
Happy crafting!

Trinity Products 

Stand Alone Die: Slimline Center Burst Die set from Trinity Stamps

Embellishment Mix: Bubble Blow Out Flat Back from Trinity stamps

Other Products

Cardstocks: White Speciality Glossy CS from DCAM store

Glitter CS: Brights a pack of 24 sheets from Little Birdie

Cardstocks: White Speciality Glossy CS from DCAM store

Glitter CS: Brights a pack of 24 sheets from Little Birdie

Distress Ink: Pink Raspberry, victorian velvet

Stamp: Most Wonderful stamp set from Uniko stamps

Archival Ink: Jet black

Acrylic Paint: snow white from Little Birdie

Twine: baby pink double shade from American Crafts

Would love to join these fun challenges:

http://kaartjes-inspiratie-challenges-blog.blogspot.com/2021/11/kic-start-uitdaging-160-kerst.html

http://craftyhazelnutschristmaschallenge.blogspot.com/2021/11/chnc-challenge-567.html


Sunday, 31 October 2021

Christmas Tea!

Hello everyone!

Happy Monday!

What could be cosier than a warm and festive cuppa?

I just love the design of this fancy teacup die with so many little details from Trinity Stamps!

I started by blending my background at the top and bottom using DI.

I die cut the two sets of cups in the traditional Christmas red and green colours. I love these striped PP in festive colours.


Then I dry embossed the shape of teacups on a piece of white CS and fussy cut it. Adhered these pieces to the embossed cups.

I added some crystal drops as snowfall over the top to make them nice and shiny.

I stamped some flurry of snowflakes around the cups and added the sentiment.

How fun this set be to make invitations and favours for a Christmas Tea!

Happy crafting!

Supply List

Trinity Stamps Product: Teacup die

Other products: 

Cardstocks: Whisper White CS, Bright red and green CS

Pattern Paper from Lawn Fawn

Stamps: Snowflakes from Inkadinkadoo Stamp set; sentiment is from W&W Snowy Holiday stamp set

Distress Inks: candied apple, 

Archival Ink: Jet Black

Nuvo Crystal Drops: white bizzard

Sunshine Blast card and an announcement!

Hello everyone!

Happy Monday!

I am so excited with an announcement as I am one of the Trinity Brand Ambassadors, Happy dance!!!

I received a Stand Alone Centre Burst die along with a freebie Teacup die as an order.

The Center Burst die is just Fabulous and can be used with many variations! You can use any color cardstocks or designer paper or any technique to make a stunning card.

 I think the Center burst die is so easy to get those perfect rays! 

I am showcasing this fab die in a unique way to use!


I cut out the Center Burst die out of Pearlescent Cream and black color CS. Then I take out the sunrays part and heat embossed them with Blue Pearl EP. 


Look at the difference on both white and black CS  using an awesome embossed pearly look on the pieces of these sun rays.


I used the sunburst outlined part and popped it up on my card base. Adhered all the heat embossed sunrays pieces in the negative space as shown in the pic.

I heat embossed the sentiment too and fussy cut it. I really like the way this sentiment looks on the base of the Burst die.


I embellished it with some bubble blow Out mixatives and it looks like snowfall in the sky.

Well, that is all for me today!

Happy crafting!

Trinity Stamps Products

Stand Alone Die: Slimline Center Burst Die set 

Embellishment: Bubble Blow Out Mixatives

Other Products List

Cardstock: Buttercream and black CS 

Pearlescent CS: cream golden color

Sentiment: Uniko stamps

Embossing Powder: Blue Pearl from Wow