Friday 30 November 2018

Hello World!

Hello everyone!
Happy Friday!

Today, I am on Cut It Up Challenges Blog along with a beautiful theme World hello day to brighten someone day!


This is my take on this pretty sketch! 


This one has a graphic look along with six pretty blooms. I inked up my stencil with a stick blending tool as shown in the pic by masking technique. As I want the Geo design at the top only. I inked only four columns of geo stripes across my card in tones of blues and yellow!


I stamped some Mogras with blue ink and layered them in the tones of blues and greens only. Added depth with my Polychromos pencils. Added some dots using Sakura white gel pen for more interest. The Hello World is a chippie word which is also inked up and highlighted with adding white dots.


I love the final output!


Supply list

Cardstock: Glossy white CS
Stamp: Mogra Layers from Mudra stamps
Stencil: Deco Pattern from Mudra Stamps
Chipzeb: Words#2 from Mudra Stamps
Die: Double Stitched Rectangles from Peek-a-boo Designs
Punch: Rounded corner 
Dye Inks: Aqua blue, turquoise, Sapphire blue, Chinese blue, Lawn green, Mustard yellow from Tubby crafts
Blending Tools: Sticks from DCAM store
Distress Markers: Evergreen Bough, mowed lawn, salty ocean
Polychromos pencils: white 101, cobalt turquoise 155, Prussian blue 246
White gel pen, masking tape

25 Days of Christmas Tag Day 16

Hello friends!

 There are such varieties and a lot of pretty inspiration tags to start your Christmas tags with awesome sponsors at 25 days of Christmas Tags by talented Tracey!

My tag is inspired by Day 16! I chose Emily's pretty tag with unique glittery background effects as my inspiration and I love how she replaced the letter O with a snowflake to create the word JOY.


To create my Joy word I also die cut the letter J &Y and added a metal snowflake for the letter O.
I love the colors mint hues with sugar spun, it reminded me of a sweet green watermelon with vibrant ruby red pulp!


I blended cracked Pistachio and candied apple DI for my background. Instead of applying glimmer paste ( I don't have it )I applied crystal clear Nuvo drops with my palette knife to create the shimmer.
Then I punched out some snowflakes in gold foil sheet with some white snowflakes sequins. Added the pearl dots for the impact of falling snow.  In the end, added a loop tag blended with DI and a green color twine bow.

And this is so easy and quick to make for gifting purpose to make someone smile!

Supply list

Cardstock: White CS, gold foil sheet
Dies:  Double stitched rectangles to create my own tag from Peekaboo Designs, Big Bold letters from DCAM store
Punches: Snowflake punch from Jags
Distress inks: Cracked Pistachio and Candied Apple
Nuvo: Crystal clear drops
Twine: Green sparkle single cord from Lawn Fawn
Metal charm: Snowflake
Liquid Pearls: White Opal

Would love to join the following challenges:

Wednesday 28 November 2018

STAMPlorations Guest Designer Post #4

Hello to all!
Happy Wednesday!


Time to share some Inspiration for Wonderful Wednesday Coloring at Stamplorations with dear Renne and Gwendolyn!


Card#1
No line watercoloring with Lotus love


Beautiful Lotus flowers a hit for me as it seems they are with you too!
I stamped few of the blooms, leaves and stems using masking technique in Tattered rose DI.


For coloring, this time I used my Staedtler watercolor pencils! And added some water wash splatters, hard to see.


For the sentiment, I cut a handmade tag in black and heat embossed the sentiment in opaque bright white EP. This tag is then foam mounted on the panel. Added a double shade baker twine to finished off as an accent!
Needless to say, I had great fun painting these flowers!

Supply list

Cardstocks: White Watercolored textured sheet, black CS
Stamps: Lotus love and a sentiment from City Girl stamp sets from Stamplorations
Watercolor Pencils: Staedtler
Embossing Powder: Opaque bright white from Wow
Water brushes
Baker Twine


Card #2
Best in Me

My first card is highlighting the quote with a bunch of layered flowers!
I absolutely love the series of Typographia stamps! Not only they are wonderful quotes and easy to create custom sentiments!


First, I die cut a tag using the smallest rectangle with double running stitched rectangles and eyeletted it. Then stamped the quote using black archival ink.


I think the mix of fonts is so beautiful and really wanted to take centre stage. I made two horizontal slits along the bottom of my card front.  I started by blending my card front along with my tag with three different color dye inks. Then spritzed with water. Added some splatters with perfect pearls.
I stamped some flowers. I applied the dye inks directly on the stamp shown in the below pic.


Colored them and highlighted with glitter pens. I fussy cut apart all those leaves to make my bunch of flowers.


I just tucked all my flowers and leaves with dimensions along with my tag. I love these bunch of flowers with Perfect sentiment highlighting so well!

Supply List

Cardstock: Glossy white CS
Stamps: Typographia Romantique- Best in Me and Sweet Spring Wishes from Stamplorations
 Dies: Double Running Stitched Rectangles from Cutplorations
Archival ink: Jet Black
Dye inks: Raspberry, hot pink, lilac purple, lawn green, lemon yellow from Tubby craft
Perfect Pearls: silver
Wink of Stella Brush: Glitter clear
Wink of Stella pens: Fine glitter duct- pink, green, purple
Double shade string
Black Eyelet, eyelet settler, pink hanging ornament and shining pearl string


Card#3
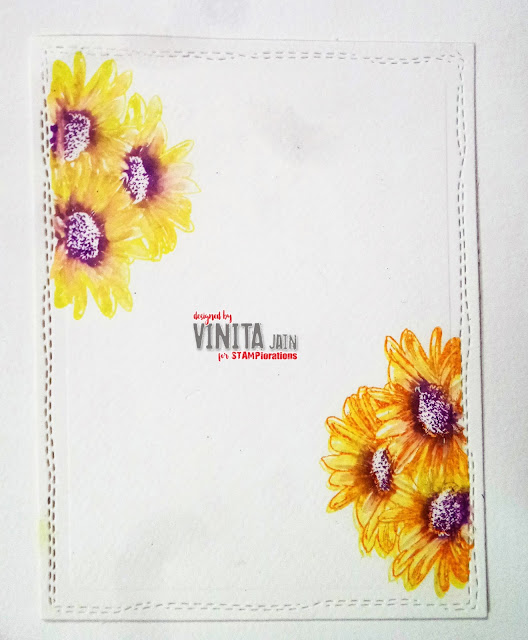
Layered sunflowers


I fell in love with this Typographia Best in Me saying so I decided to make another one but combined it with a Pocket Blooms stamp set and different color palette!


I die cut a panel and stamped directly those pretty blooms in DO at both corners and lightly watercolored them. You can see the difference clearly. I watercolored the top corner and left the bottom corner as it is.


Then inked up the same bloom image using Curved pumpkin DI.


Then stamp that saying in black archival ink on another die cut panel and matted them.

Comment to win at Stamporations blog with my co-designers blog to win a $15 G.C. Hoping you inspired with my projects!

Happy crafting!


Supply List
Cardstocks: Glossy white CS, Black and grape wine color CS
Stamps: Typographia Best in Me stamp set and Pocket Blooms stamp set from Stamplorations
Dies: Double Crazy Double Running Stitched rectangles from Cutplorations
Distress Oxides: Wilted violet, squeezed lemonade, Hickory smoke
Distress ink: carved pumpkin, fossilized amber
Archival ink: Jet Black


Would love to join my projects in my fave challenges:

Card#1 Lotus Love
https://www.thedailymarker.com/2018/11/day-1-the-30-day-coloring-challenge-coloring-link-up/
https://lovetoscrapchallengeblog.blogspot.com/2018/11/ltscb-115-anything-goes.html
https://www.simonsaysstampblog.com/wednesdaychallenge/simon-says-anything-goes-56/
http://justkeeponcreating.blogspot.com/2018/10/november-2018-anything-goes-link-up.html


Friday 23 November 2018

Two pretty cards!

Hello friends!
Happy Saturday!
 I m so excited to share with you two pretty cards that I created with awesomely printed Critter sheets and this time I received some uncolored images too in my DCAM DT kit!!!

My first card is showcasing pretty Anemones! I really enjoyed coloring them and these florals are perfect for any coloring medium!


Card#1
Pretty Anemones


To create my own pattern background, Placed the dual cube stencil on the white surface area and secure it with washi tape or painters tape. Add pattern to your project by blending inks. Gently pull the stencil off from the project area to see the result.


This stencil will help you to create an amazing woven background. Flip the stencil over the pattern and then apply the different color to achieve the good result.

Then I fussy cut some anemones from the ready to color anemones critter sheet and started coloring with some Chameleon pens. Add depth by shading using polychrome pencils of the same color shades.


Die cut some duo leaves, colored them and added some white gel pen dots.


Now I placed the stencilled panel in two different angles with my blooms and leaves. Added the fussy cut sentiment.  Added the fussy cut Congratulations banner from Sentimental bannerrific Critter sheet. Embellished it with some enamel dots.
Love the way it turned out so beautiful! I hope you enjoyed this card. There are a lot of possibilities with this critter sheet Anemones flower!

Supply List

Cardstocks: Glossy white CS
Critter sheets: Ready to color Anemones, Sentimental Bannerific from DCAM
Stencil: Flip over Dual Cube Builder Stencil from DCAM
Dies: Leaves Duo from DCAM
Chameleon Pens: RD3, RD5, GR2, GR3
Polychromos Pencils: 101,129, 155, 225
DistressInks: Cracked Pistachio, Lucky Clover
Sakura White gel pen
Fine liner black pen
Pop Dots


Card #2
Humming Bird


I started by fussy cutting some floral clusters, leaves and hummingbirds from DCAM Hummingbird critter sheet.


On a piece of heavy white CS, I created a woodgrain background using texture paste and with my woodgrain tool I created the textures and inked it. While it is still a little wet I sprinkled some Mermaid glitter powder for more interest and textures.


That beautiful border on the bottom was created by die cutting one of the dies from DCAM Pierced Scallop Borders dies set.


Isn't that hummingbird absolutely amazing? Seriously, Mansi Thinks of everything!!!
It is so easy to create any scene with dimensions and textures with so many components! And that bold chiplet sentiment Hello is icing on the cake! Finished it off with a shine on sentiment and some gold dots.

Supply List

Cardstocks: Glossy white CS, Espresso color CS
Critter sheets: Humming Bird from DCAM
Chiplets: Hello word from DCAM
Dies: Pierced scallop border die set from DCAM
Stamp: sentiment from Sunny Mae (Some odd girls stamp set
Texture Paste: Rangers
Woodgrain Tool: Nirmal stationers
Spray: Bamboo from Papericious
Embossing Powder: Opaque bright white from Wow
Glitter dust: Mermaid Crystal

Wednesday 21 November 2018

Pretty succulents on wedding day

Hello friends!
Happy Wednesday!

This is a peek of wedding season here and I have to attend some wedding parties next week. I recently added some new goodie stamps in my stash & excited to play with them. I created an elegant card and I am so happy how beautiful this turned out and perfect for a lucky newlywed couple! Love the color scheme on this with all glamour and shine to it. And the couple could display it in their home with some wedding pics! What a beautiful way to send and share some smiles!


I started by stamping some succulent floral pattern at the bottom of my panel and heat embossed in nice ice blue glitter and added some botanical elements in metallic gold-rich pale by embossing them too. Now watercolored them using Zig markers.


Next,  Die cut another panel in white with a scalloped designer border and highlighted with copper border. Added the wedding couple to that scalloped border panel.  On a hand cut banner added the Happy sentiment, heat embossed it and added the tiny phrase using heat embossed technique again.
Adhered this panel to my main stamped panel.
Next, Die cut the couple two times, groom, in cobalt blue and bride in white with a copper border at the edge of her wedding gown. I adhered the figures to the card front with a mix of flat and foam adhesive.


And here is the matching inside too.


Hoping you all enjoyed this beautiful project!

Supply list

Cardstock: Whisper white in 300gsm, Cobalt blue CS, copper sparkly sheet
Stamps: Happy Succulent stamp set from Uniko; Love this sentiment stamp set from Kaisercraft 
Dies: A2 Scalloped Borders 2 from Spellbinders; Wedding couple from Peekaboo designs
Embossing Powders: Metallic gold-rich pale and Nice Ice Blue Glitter from Wow
Clear embossing Pad: Versamark
Zig Clean clear real brushes: Blue
Archival ink: Jet Black

Friday 16 November 2018

Thanksgiving card in rainbow colors!

Hello to all!

I created a beautiful Thanksgiving card for my DT post at Cut It Up Challenges!


For the leaf print, I went with a rainbow color scheme. I pulled out my Distress Inks and stamped randomly on a double running stitched white panel.
The sentiment with border is also from the same stamp set. I gave it a metallic look by heat embossing at all the edges for shine and more textures.


Die cut two different size leaves and distressed them, added the metallic shine using heat embossing, tied them with a two shades thin string.


Finished it off with some sequins and rhinestones.

Supply list

Cardstock: White CS
Stamp: Art of life stamp set from Technique Tuesday
Dies: Double Running Stitched rectangles from Cutplorations; Dual leaf from Peekaboo designs
Distress Inks: mermaid lagoon, carved pumpkin, fossilized amber, lucky clover
Memento: lilac poises
Archival ink: Jet black
Embossing powder: Metallic gold rich pale from Wow
Sequins: Golden
rhinestones and a string

Would love to enter my card in the following challenges:


Wednesday 14 November 2018

STAMPlorations Guest Designer Inspirations post #3

Hello everyone!
Happy Wednesday!

Once again, time for Wonderful Wednesday Coloring inspirations for Stamplorations blog to share our coloring techniques!

Card #1 Giving Thanks to Teacher 


This is perfect for a special teacher Thank you card!
Firstly I stamped the Kathryn image on a watercolored sheet and colored it with Zig brushes and highlighted with Dark pink Glitter pen.  Don't bother if the color is out of the image, I fussy cut it. Removed the flower part and added a pencil to hold her in hand. Sorry forgot to take the picture in between coloring work.


At the bottom of my one layer card, I created a stencil pattern using DI.  Above the stencilled pattern, added a double-sided scoring tape and burnished a fine glitter in brown color very well with my finger.
I created a super fun background pattern with all the little images from the Kathryn Thanks Teacher stamp set at the white remaining space. Colored the images using Zigs again. Added Wink of Stella glitter pens to the books in dark brown and dark pink to apples.


Now on a shining vellum strip stamped one of the sentiment and heat embossed it with Black ebony EP.
Added a set of books with double-sided adhesive foam for more dimension and pencil to the image.


Supply list

Cardstock: Glossy White CS
Shining Vellum sheet
Stamp: Kathryn Thanks Teacher Stamp set from Stamlorations
Stencil: Broken Glass from Artplorations
Distress Ink:
Zig Clean Clear Real Brushes- Set of 12
Archival ink: Jet Black
Embossing Powder: Black ebony from Wow
Fine Glitter: Brown
Double-sided adhesive scoring tape
Fine outliner black pen
Foam dots


Card#2 Flowers in Rainbow colors

This card started out as an experiment. A very fun and colorful too. I might add, I wasn't sure it was going to work but I kinda dig the bold look that came out in rainbow colors!


There is no actual coloring done for them, I have used Ken Oliver Color Burst Powders with water, glossy white CS and a spritzer. The colors tend to go all over the place but it sure is fun!


Let's start with the beginning, I cut out some florals and leaves out of black CS. I created a pattern using these die cuts and using an adhesive quick stick I adhered them all on a white CS. I just sprinkled the powders on the piece directly and then sprayed water on it to activate the colors. Let it dry on their own or you can use a heat gun too.


Then I added some black and golden polka dots to create the background for more drama and textures.


Finished it off with a die cut sentiment in gold foil sheet with a black shadow- "Life is good".


Supply list

Cardstock: Glossy white and black CS
Metallic Sheet: Gold
Dies: from Cutplorations
Color Bursts: Pithalo green, violet, orange, lemon yellow, crimson pigment powders from Ken Oliver
Brusho: Cobalt blue
Enamel Accents: Black from Ranger
Stickles: Gold
Wink of Stella: Glitter pen- Dark pink

A trio of Butterfly Tags

I created three different color techniques on these pretty butterflies. I love the detailing on the butterfly images. For all my 3 tags, I used color bursts to create the background.


I die cut 3 tags out of a watercolor sheet.

On one of the tag, I spritz water on the surface and added the pigments of different shades of color bursts and blow on with a drinking straw to spread the colors. 


Then on the first tag, I directly stamped the biggest butterfly image and added a strip of the sentiment which is heat embossed with wow embossing powder in opaque bright white and I added different shades to the sentiment too using my gel pens. I love the tye and Dye effect on this one!


One of the second tag I didn't remove that tag die and used it as a stencil. I stamped the butterfly images and colored the detailing parts using glitter gel pen for some shine and added a strip of sentiment which is heat embossed in white.

And on the last remaining tag, I directly added the pigments of color bursts and then spritz with water. Both techniques are having different results.


I added some bokeh technique circles using my finger daubers and white pigment ink. And stamped some text sentiments in the background here and there. Added some blue tiny sparkly dots at some circles and at one of the edges. Using my gel pens I added more details to my circles by outlining them. And added the sentiment. Stamped two different butterfly images and colored them with my gel pens, fussy cut them.


Tied all the tags with crinkle ribbons and one with sequins ribbon. Die cut some leaves and flowers from a scrap left. And finished them off with these die cuts and some sequins.

Kindly visit and leave the comments on all other Guest Designers blog and Stamplorations blog to win $15 G.C.

Supply list

Cardstock: Textured watercolor sheet
Stamps: Trendy Butterfly#2 stamp set from Stamplorations
Dies: Trendy Spring blooms from Cutplorations; Tags from Tim Holtz
Ken Oliver Color Bursts: Pithalo green, orange, brown, violet, lemon yellow
Archival ink: Jet Black
Pigment ink: Bright white
Embossing powder: Opaque Bright white from Wow
Gel pens: Glitter pens and neon moonlight pens
Tiny dots: turquoise blue
sequins, sequin trim, crinkle ribbon

Would love to participate in the following challenges:

Teacher Thanks card:
http://pennyblackatallsorts.blogspot.com/2018/11/november-make-someone-smile.html
https://happylittlestampers.blogspot.com/2018/11/hls-november-watercolour-challenge.html

https://lovetoscrapchallengeblog.blogspot.com/2018/11/ltscb-115-anything-goes.html
http://craftstamper.blogspot.com/2018/11/take-it-make-it-challenge-november.html
https://www.thedailymarker.com/2018/11/day-1-the-30-day-coloring-challenge-coloring-link-up/


Colorful floral card:
https://happylittlestampers.blogspot.com/2018/11/hls-november-anything-goes-with-dies.html


Butterfly Tags:
https://butterflyspotchallenge.blogspot.com/2018/11/111-spin-butterfly-wheel-with-thel.html- colors(Pink and blue in the butterfly) + repeat +butterflies

http://craftstamper.blogspot.com/2018/11/take-it-make-it-challenge-november.html