Sunday 27 February 2022

Ombre glittered Gerbera in shades of pink!

 Hello everyone!

Happy Sunday!

Have you got lots of embossing glitters in your stash but ensure how to use it I have a technique for using glitter in ombre style look to make your card shiny and sparkly, so let's get started!

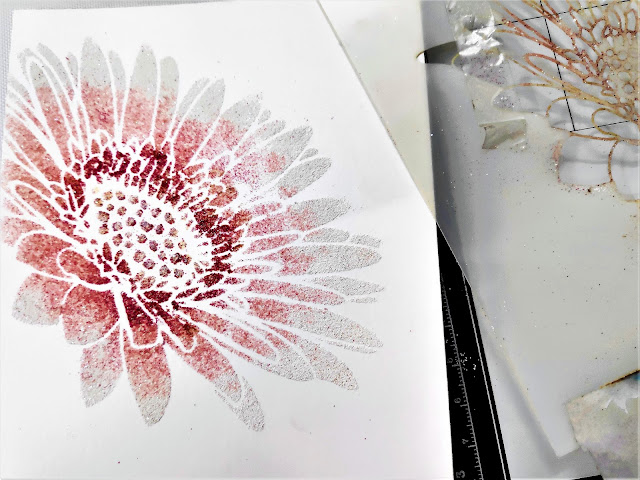
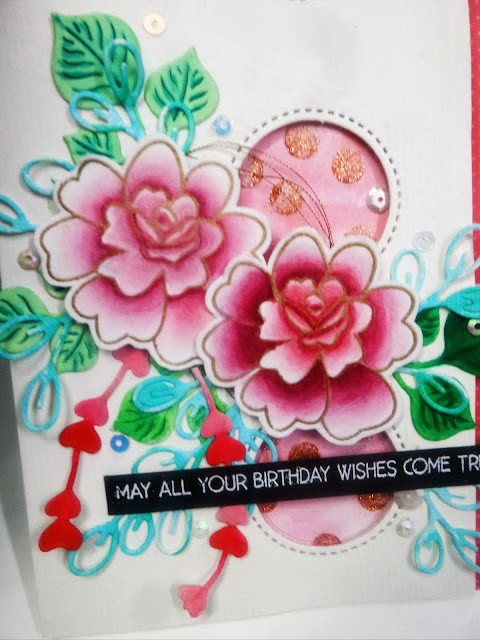
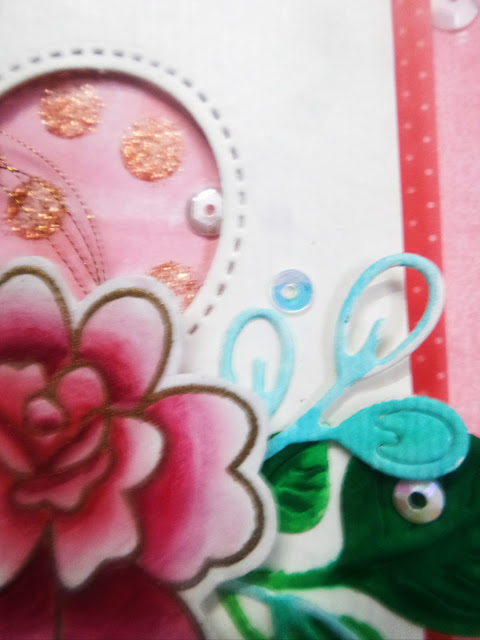
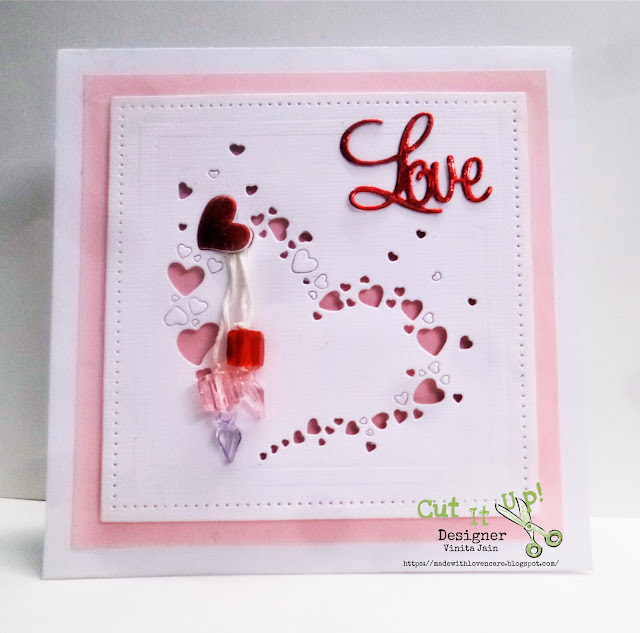
I am showcasing Gerbera's stencilled flower. It features gorgeous details and fine lines. The generously-sized flower allows you for an abundance of techniques whether it is water coloring, ink blending, heat embossing to make different patterns always!

Happy to share:  In Top picks here:

https://pixiessnippetsplayground.blogspot.com/2022/03/results-of-challenge-422.html


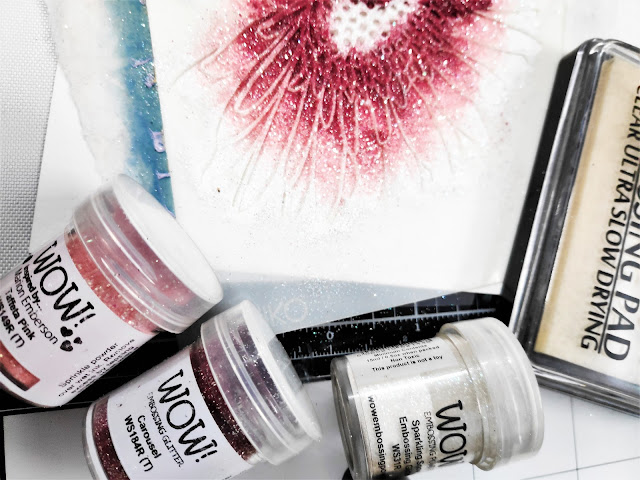
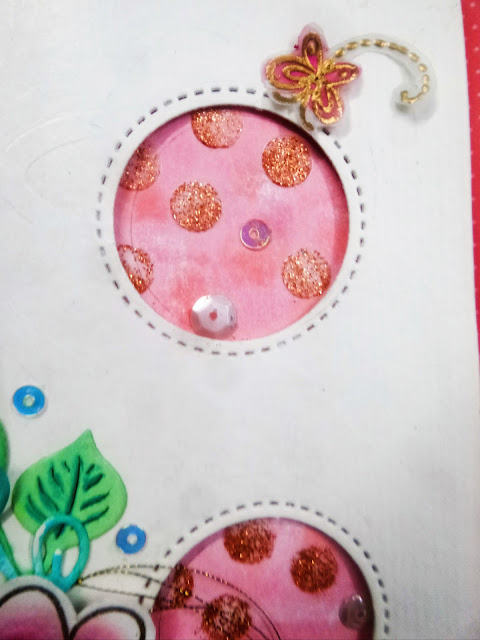
I started off with my Gerbera stencil on a white panel and applied clear embossing ink using my dauber. Covered the embossed ink design using 3 different embossing glitters as shown in the below pic:


Now heat embossed that panel, love the results.


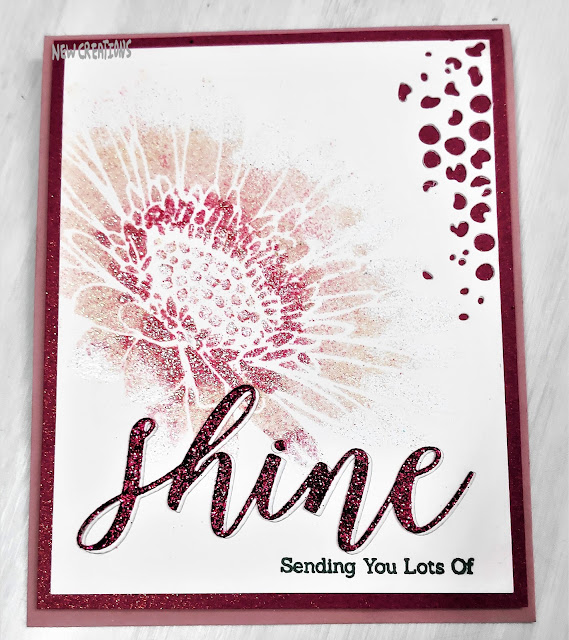
The sentiment is from the Happy Succulents stamp set. Now added some Mixed Media die dots at the top right corner for some textures.
Die-cut a bold shine sentiment 2 times and adhered the glittery pink on the white one for the shadow look. Placed that die cut sentiment.


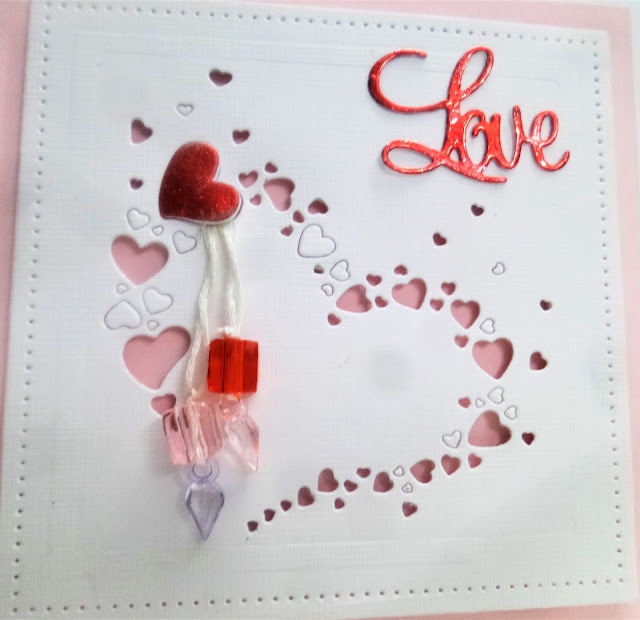
Tried to showcase from different angles!
Adhered that panel on a snippet of dark pink glittered sheet and then my card base.
I made this card for my daughter's friend to make her day more special with some shine as she loves sparkles!
Wishing you all a lovely day!
Happy crafting!

Supply list
Cardstocks: Snippets of Whisper White CS, sparkly pink CS, Victorian pink from Craftangles
Glitter sheet: Snippets of Dark pink glitter sheet from Itsy Bitsy
Stencil: Pure Florals Gerbera from Uniko
Stamp: Happy Succulents set from Uniko stamps
Dies: sentiment Shine from Winnie & Walter; Mixed Media 660220 from Sizzix
Embossing ink: Clear ultraslow drying from Wow
Embossing glitters: Sparkling snow, Taffeta pink, Carousel from Wow
Dye Ink: Black licorice from Lawn Fawn

Would love to join these fun challenges:


Friday 25 February 2022

You are so cool

Hello to all!

Happy Saturday!

With this adorable snowman ornament, I almost don't mind the thought of snow, how about you?


I die cut this snowman ornament 2 times, one using white CS and another one using the double-sided adhesive sheet.
 I removed the snowman parts out of white CS ornament and distressed it with tumbled glass and stormy sky inks using lots of water as shown in the below pic.


I die cut a pierced squared panel in white. And using a snowfall stencil I applied white textured paste and quickly sprinkled some diamond dust on it for a sparkling snow effect.


Added a dotted holographic panel on my white card base and adhered my pierced panel on it with a snowman ornament, added a silver string with you are so cool sentiment and a tiny heart.


Hoping you enjoyed the process of it.

Happy crafting!

Supply list

Cardstocks: whisper white CS

Holographic sheet: Dotted from Die Cuts and More

Dies: Pierced squares from Spellbinders; Snowman Ornaments from Crafters Corner

Stencil: HS00838 from Heidi Swapp

Stamp: You make my heart spin from MFT

Distress Inks: tumbled glass and stormy sky

Dye Ink: Black Licorice from Lawn fawn

Texture Paste: White from CrafTangles

Diamond dust: Twinklets from TCS

 Thread: silver

Would love to join these fun challenges:

https://abcchristmaschallenge.blogspot.com/2022/02/abc-christmas-challange-c-d-are-for.html- CAS anddistressing both

https://scrapsoflifebyscrappymo.blogspot.com/2022/02/february-rudolph-days-challenge.html


Monday 21 February 2022

Green branches with Meadow Butterfly!

 Hello everyone!

Happy Tuesday!

I am very much inspired by green with some insects at Let's Squash it and dusted off my old embossing folder!

And here is my Today's card!


I started by blending some DI using different shades of green and added some water splatters on it.


Wham Bam!!! Can you see how I changed it?
I embossed this panel using my branches EF. Then lightly rub the Opaque bright white ink across the embossed part only. Tada done!


I used meadow butterfly as my insect and die cut 2 times out of a scrap of white CS. And colored the flowers and branches only using my ZIGs. 


I die cut 3 times dotted rectangles and placed a vellum sheet in between my rectangles to visible the embossed background through this panel. Die-cut hello word 3 times in green sheet. Now adhered that rectangle panel with my butterfly and sentiment on an embossed panel and adhered it to my base card panel.


Inspire, create and share, that's what I  love to do!
Happy crafting!

Supply List
Cardstocks: Whisper white and forest green CS
Vellum sheet
Embossing folder: Branches, swirls & Ribbons set from Sizzix
Dies: Meadow butterfly #2 from Sizzix; Hand-lettered Hello from WPlus9; mini slimline dotted rectangles from a dress my craft
Distress inks: twisted citron, mowed lawn, cracked pistachio, lucky clover and forest green
ZIG watercolor brushes
StazOn Opaque from TSUKINEKO
White gel pen

would love to join these fun challenges:


Thursday 17 February 2022

Beautiful Blooms III meet Dot Coloring Technique

 Hello to all!

Happy Friday!

Uniko stamps are celebrating their 10th Birthday this whole month. 

And Today I am CASEing one of the cards by its owner and talented designer Beverley Brown using the Dot coloring technique inspired by such an amazing crafter Jennifer Mcguire!

So here is my card for Today.......


I love this technique from my old days as I played this fun technique on my school projects. 
The touching of different alcohol markers using dots without any coloring made it so unique around the stamped florals.
Here is Bev's card I CASE'd. I was inspired by her rainbow color palette around the image. You can visit her page here.


I started by die cutting a double stitched panel and stamped the outlined florals first using my Misti in Jet black ink. Then stamped the detailing inside using blue, yellow, pink, red, green as my color palette.


 Then added dots around the outlined images and on detailing lines inside using various alcohol markers, this makes the image pop.


Stippling with alcohol markers is very relaxing and easy to do with results that I think are pretty pleasing. You can see the stipples in different colors that radiate out to thinner consistency then fade into white. The sentiment is from another set and I fussy cut and popped it using foam tape.
A close-up view:


Lots of good crafting vibes are headed your way!

Supply List
Cardstock: Whisper White CS
Stamps: Beautiful Blooms III and You are, Yes You stamp sets from Uniko
Dye Inks: frosty pink, coralberry, sea glass, buttercream, forest glades from Altenew
Alcohol markers: RV10, R11, B01, B02, Y11, Y15, YG03, YG17from Copics and 121, 198 from Touch markers
Archival ink: jet black
Misti

Would love to join these fun challenges:


Tuesday 15 February 2022

Birthday Card in mixed media style!

 Hello friends!

Happy Wednesday!

I am popping in today to share with you this bright and cheerful Birthday card celebrating Uniko !0th Birthday, Many Congratulations Bev!

 I just love all the elements and details of this card!

https://daranddiane.blogspot.com/2022/03/shades-of-pink-winners.html

(IMP: I posted it today only and I can't able to revert the date, hope u all understand)


I  started with stamping the beautiful blooms and heat embossed in rich Gold pale EP. I colored them with my Chameleon Markers, fussy cut both.


Now created my own background panel to match the colors with my flowers using Gelli plate, brayer, DO and a scattered polka dot stencil.


Now die cuts some foliage, leaves and watercolored them too using my ZIG brushes. Die-cut a focal panel in white using some double stitched circles. I applied copper glitter paste using the same polka dot stencil which is peeking behind from the 3 circles. And arranged them all along with a copper thread underneath the flowers..


Stamped the sentiment on a black strip and heat embossed it in white. Added a tiny vellum butterfly. Embellished it with some sequins and added a strip of printed polka dot vellum sheet too.


I hope you have a wonderful day!
Happy crafting!

Supply List

Cardstocks: Glossy CS from Die cuts and more store, whisper white CS, textured CS and black CS

Vellum sheets: white and printed vellum from Heidi Swapp

Stamps: Beautiful Blooms II and Cosmos stamp sets from Uniko stamps; Butterfly from Scrapberry's My little bear set

Stencil: Scattered polka dots from Uniko

Dies: Meadow foliage set and Leaves set from Itsy Bitsy; flourish #13 from Cheery Lynn

Glitter Paste: copper from Crafters Corner store

Distress Oxides: Abandoned coral and kitsch Flamingo

Embossing powders; Opaque Bright white and Gold rich pale metallic from Wow

Gelli plate and brayer from Itsy Bitsy store

Sequins: Pink story sequins from Crafters Corner store

Copper thread

Would love to join these fun challenges:

http://sirstampalotchallenge.blogspot.com/2022/02/february-challenge.html

https://www.welovestamping.co.uk/2022/02/february-challenge.html

https://daranddiane.blogspot.com/2022/02/shades-of-pink.html


Monday 14 February 2022

CAS Valentine card

 Hello friends!

Happy Valentine's day!

Just popping to share a CAS card featuring the Waffle flower Stitched Heart die, how beautiful it is!

On a piece of white CS, I first die the cross-stitch heart and partially embossed XOXO on both sides of the heart. Then die cut the cross stitch heart from a scrap of red CS and arranged all the pieces in the white negative space.


Now stamped the sentiment you are my everything in jet black ink. Die-cut a tab and stamped the Happy Valentine's day one in red DI to match the focal point.
Now adhered that panel to my red CS using foam tape.
Happy crafting!

Supply list
Cardstock: White and red CS
Dies: Cross stitch heart from Waffle Flowers, The tab die from the spinner die set from Nellie Snellen
Embossing Folder: Valentine Set#3 from Sizzix
Stamps: From the heart stamp set from Itsy Bitsy and forever yours set from Craftscrappers
Archival ink: Jet black
Distress ink: fired brick

Would love to join these fun challenges:


Friday 11 February 2022

Hearts all around!

Hello everyone!

Happy Saturday!

Love..... it's not just for your lover.....

It's for all the people we love to show them our affection or to celebrate a moment!

Yayyy!!! Show stopper here:

https://colorfuloptions.blogspot.com/2022/03/february-challenge-winners.html

So here is my card following the Love/Valentine theme......


I die cut a pierced white square panel out of a textured white CS and die cut again Hearts all around at the centre. Then popped it up using foam tape on a pink panel and adhered it to my white card base.

on a sticky adhesive sheet, I placed a snippet of red foil and die cut the biggest heart and love word from the foiled sheet.

For me, the red foiled heart definitely popped out well with hanging beads!

Have a nice day!

Keep crafting!

Supply list

Cardstocks: Whisper white, textured white and baby pink CS

Dies: Hearts all around from CrafTangles; Pierced squares from Spellbinders, love word from Dee's Distinctively

Reactive foil: Red from CrafTangles

Sticky Back: Double-sided Adhesive sheet from CrafTangles

white floss and transparent colored beads from my stash

Would love to join these fun challenges:

https://www.hndmd.com/articles/craftangles-monthly-challenge-2022-february/


Tuesday 8 February 2022

Happy Succulents Birthday card

Hello friends!

Happy Wednesday!

I am popping in today to share with you this bright and cheerful Birthday card celebrating Uniko !0th Birthday, Many Congratulations Bev!

I just love how it popped against white. I stamped my image in DI and colored it with my Polychromos pencils. Then fussy cut the image. 

I die-cut double stitched rectangle panels 2 times. Then again die cut one of these rectangles stitched panels using stitched basic edges. And stamped some pinstripes using DI. 


And stamped the other one with Happy Birthday sentiment.


I used light purple CS for my basic CS. Then placed one of the stitched rectangle panels in the centre. Now arranged the other two panels with my bouquet of Happy succulent floral images using foam tape. I love how the succulents popped off with the stripes.

Finished it off with an enamel heart and some sequins.

I hope you have a wonderful day!

Supply List

Cardstocks: lots of snippets of Whisper white CS and light purple CS

Stamps: Happy Succulents stamp set and Background Block Pinstripe from Uniko stamps

Dies: Double Stitched Rectangles from Peek-a-boo designs; stitched basics edges from Die-namics

Distress inks: mawed Lawn and wilted violet

Polychromos: Color pencils set of 52 

Archival ink: jet black

Sequins: DMCS3536 and green cup sequins from Craft Medley

Purple Enamel Heart

Would love to join these fun challenges:

http://unikostudio.blogspot.com/2022/02/happy-february-and-happy-10th-birthday.html