Showing posts with label fussy cutting. Show all posts

Friday, 31 March 2023

Uniko 11th Birthday Release In Review Brand Ambassador Blog Hop & Giveaway!

 Hello friends!

Happy Friday!

I am back with the review release hop as last time due to some International Post office issues the package didn't arrive on the time. 

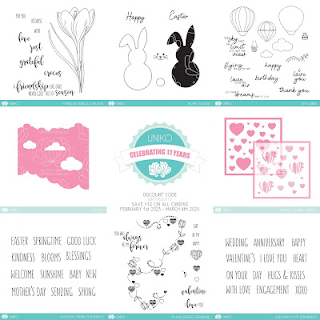
Here are the latest releases pic and Bev, the owner of the Uniko studio decided for another chance to win with a blog hop and giveaway!!!


I fell in love when I got the Uniko UP & Away stamp set and Cloud 9 stencil in my hands, so many ideas came to my mind and finally I come up with my watercoloring technique background using Cloud 9 stencil only.


Here are the pics of how I started with my background using this versatile stencil, so many options.....


I used Liquid watercolors to create my background full of cloudy sky and the edge of the sea.


I stamped the images and watercolored them using my ZIG brushes.


Here is the final outcome!


Can you see the silver shining clouds???


Hope you enjoyed it!

Don't forget to purchase any stuff from the Uniko Brand!

 The blog Hop link is here

Bev will choose one lucky winner to receive a Uniko Clear Stamp & Stencil Bundle worth a minimum of £ 30

Simply leave a comment along all stops of the hop before midnight BST Saturday 8th April.

Happy crafting!
Will come back with more inspirations soon using Uniko Brand!!!

Supply list

Stamps: Uniko Up &Away clear stamp set

Stencil: Uniko Cloud 9

Liquid watercolors: poolside, turquoise, shooting star, moss green, evergreen, pretty peony from CrafTangles

ZIG Real Watercolor brushes

Archival Ink: Jet Black

Thursday, 18 February 2021

Happy Birthday!

Hello!

For today card, I started off by creating the scattered polka dot pattern on my main panel. 

PS: Yay! I won the challenge here!!!

On a stitched rectangle white die cut panel I adhered my stencil and applied embossing ink through my sponge dauber. Then spread the bonding powder and after heating added blue foil on the top. And run through my Bigshot machine for equal pressure. Voila, great foil dots appeared. It is my first trial ever without using any machine.

Next, I adhered my piece on a blue mirror CS and then a white base card panel. I die cut a stitched circle in white framed it on blue mirror CS circle. Die-cut a happy word and stamped birthday sentiment in blue.

Then I stamped a flower and leaf, heat embossed them in silver sparkle EP. Then watercoloured them and fussy cut all. I adhered my flower and leaf with foam squares for some dimension. And finished it off with some silver sequins!

I really hope you like my card with foil element to shine!

Happy crafting!

Supply List

Cardstocks: whisper white CS

Mirror  sheet: blue

Reactive foil: Blue from Craftangles

Stamps: You are, Yes you stamp set and Happy Succulent stamp set ( used birthday sentiment) from Uniko

Stencil: scattered Polka Dots from Uniko

Dies: Stitched rectangles from Little Birdie; Stitched circles from Peekaboo designs, circle from WRMK, Birthday word from Sizzix

Embossing Powders: Bonding powder and Mettalic platinum sparkle from Wow

Dye Ink: Danube blue

ZIG real brushes: Light blue, blue, pale green, emerald green, blender

Would love to join these fun challenges:

https://unikostudio.blogspot.com/2021/02/happy-9th-birthday-uniko.html

https://unikostudio.blogspot.com/2021/01/uniko-challenge-63-anything-goes.html


Friday, 29 January 2021

Snapshot!

 Hello everyone!

For my card, I created a jungle scene and the theme is the point of view!

I used a super cute stamp called Wild things and colored it with my Zig markers. 

I then used a scalloped frame for the scene and adhered it to my Kraft card base.

I paired my image with a Leaf stencil to create my background since I wanted to capitalize on the jungle feel on it. I added a snapshot sentiment in black and popped this base with dimensions. I used a polaroid die for my picture frame and added a die-cut word Perfect which is already distressed. 

And die cut some wild greenery leaves and tucked them near the frame to look like jungle foliage.

I added a cute camera for this photoshoot which is paper pieced and enhance the beauty of this scene with some tiny flowers from my stash. Added some sheen to my giraffe image. Hard to catch.

Hoping you enjoyed my card today!

Wishing you a wonderful day!

Supply List

Cardstocks: Kraft CS, whisper white CS, Black CS

Pattern Paper: From Bo bunny

Stamps: Wild thing from Candibean; (Sentiment) Calendar from Kaisecraft 

Stencil: leaves from Expressions craft

Dies: Stitched scalloped rectangles from Die cuts and more; Polaroid from Kaisercraft; camera from Sizzix You &  Me die set; Wild greenery from Dienamics; Word perfect from Waffle Flower

Dye ink: black Licorice from Lawn fawn

ZIG watercolor brush pens

Distress inks: twisted citron, mawed lawn, cracked pistachio, lucky clover, candied apple

Would love to join these fun challenges:

http://sirstampalotchallenge.blogspot.com/2021/01/january-favourite-stamps.html

https://happylittlestampers.blogspot.com/2021/01/hls-january-anything-goes-with-dies.html


Friday, 7 August 2020

Designer Shaped Gate Fold card

Hello everyone!
Happy Friday!

Today, I am showing you how to make a shaped gatefold card using designer border die and this one is simplest!


For this, I used a textured rich red card base in A4 size. Scored at 3'' from each side and burnished the folds well with a bone folder for the crisp edges. Using my designer scalloped borders die, I die cut both the front panels. Now I placed my scattered polka dots stencil on both the gatefold flaps and heat embossed some dots in gold sparkle and some in red ink.


I stamped the flower and leaves images on white cardstock. First I heat embossed the outlined images using gold metallic sparkle EP and layered the floral images in hot summer ink colors using shades of red, yellow and green. Fussy cut them all.


Die-cut a scalloped circle out of red and a stitched circle out of white CS. Arranged my flowers.
Adhered it to the left side of the opening in the centre ensuring that only the left half closure piece attached well.


Close-up picture of the sentiment.
Hoping you all enjoyed the project.
Happy crafting!

Supply list
Cardstocks: Red CS, White CS
Stamps: Beautiful Blooms III and sentiment is from Spring botanical daffodil from Uniko 
Stencil: Scattered Polka dots from Uniko
Dies: Designer Borders from Die cuts and more, scalloped circle from Peek-a-boo stamps, stitched Layer circles from Memory Box
Dye Ink colours: Warm sunshine, Mango smoothie, Crimson, blush, evergreen, frayed leaf from Altenew
Embossing powder: Metallic gold sparkle from Wow
Embossing Inkpad
Misti

Would love to enter in these challenges:


Wednesday, 1 July 2020

Yes you! You are loved

Hello to all!
Happy Thursday!

I pulled out one of my new favourite stamp set for my card, keeping it CAS.
And this card can be used for any celebrations!

There is a challenge at Less is more using solid and outline image as well. 


I chose a very soft colour to create a wonky striped watercoloured background on a stitched rectangle using a stencil. Added some splatters.


I first stamped the outlined floral image in Coral berry and solid part in with cotton candy and frosty pink Altenew inks. Stamped the leaf part as well in Evergreen ink and solid with frayed leaf ink. Fussy cut them.


Adhered my focal panel to my white card base. The sentiment is from another stamp set using Coral berry ink. Arranged the floral and leaf image using foam dots.


What do you think, I just love this card with a soft look! 
I don't think it needs any embellishment :)D

Thanks for stopping by!
Happy crafting!

Supply list
Cardstock: Cream white CS
Stamps: Beautiful Blooms III and You are, yes you clear stamp sets from Uniko
Stencil: wonky stripes from Uniko stamps
Dies: Double stitched Rectangle dies from Peekaboo Designs
Altenew inks: Cotton candy, Coral berry, Frosty pink, Frayed leaf, evergreen
Misti
Watercolour brushes

Would love to join these fun challenges:


Saturday, 20 June 2020

Let's Party!

Hi everyone! 
Hoping all of you enjoying your day!

I created a fun birthday shaker card.


I am inspired by colourful pile and pinata with a white base.
I used the MFT stamp set for cute critter images an adorable tiger and a bird holding a balloon string and removed the monkey image after stamping it. Coloured it with my Chameleon pens and fussy cut it.


The confetti dots paper in gold with colourful splatters just helps add to the festivity.
On my white card base adhered that main panel with a shiny yellow strip. Added that image in the middle. Now die cut a trio of Birthday balloons, watercoloured them and outlined it with my golden pen for a festive touch. Drew the string line and added those party balloons.


 Now created my shaker panel with fun shaker elements with confetti.
Die-cut Let's Party phrase in golden sheet and added it on the OHP sheet.
Hoping you enjoyed it!


Supply List
Cardstock: whisper white
Mirror sheet: golden from Crafters Corner
Shimmer sheet: yellow from my stash
Foam sheet: white
Stamp: Jungle gym stamp set from MFT
Dies: Balloon Mania and double stitched rectangles from Peekaboo Designs, Let's Party from Sizzix
Chameleon pens: a set of 52
ZIG watercolour brushes
Misti
Shaker sequins: white frost and party sprinkles from DCAM store

 Would love to enter in these fun challenges:
https://pennyblackatallsorts.blogspot.com/2020/06/june-favourite-stamps.html- Love to play with critter stamps as these are always my favorite!
Craft monthly challenge


Wednesday, 29 August 2018

Cute as a button Baby Layout!

Hi everyone!

I 'm back to share with you my baby layout for DCAM blog inspiration. A soft, delicate, little vintage page in light pink and blue shades, made with lots of collectables, chipboard elements,  fussy cut flowers, shaker element, stamping and dies.


I think you can imagine how excited I'm, presenting my first scrapbooking baby layout!
I fell in love with Bundle of Joy collection critter sheet! I love the cute baby images, baby related elements, glossy print, colors, the flowers:D


God's most beautiful thoughts bloom into children! Babies are always such a miracle that brought joy to our lives with such a little body........My sweet baby layout symbolizes the word Yesterday as the past memories of the times gone by...... every dream come true with all happiness, love, affection, made our life complete! For this layout, I choose a sweet baby pic with the vintage feel on it!

The cute baby images inspired me to try something different this time! I fussy cut every little piece of this critter sheet with all tiny details. I wanted to create a composition of flowers around the baby image and all cute little elements to showcase as well, so created this little scene!
I also added a strip of a corrugated off-white sheet and added strips of pattern papers too, inked all of the pink scrap paper edges with distress ink, with the scissors I slightly distressed the edges too and curled them for more texture and dimension. Love the effect and textures which are giving perfect volume to this beautiful LO!
I matted my baby photo onto a pink sheet and also used a chipboard frame, heat embossed it. I also used some die cut leaves, fussy cut watercolour floral critter sheet to add underneath my photo.
I did some stamping too around my striped paper with some double stitched lines.


For the duo leaves, I used an ink smooshed technique using distress ink and die cut them. Made a cute shaker too with scallop circle dies filled with confetti Sprinklers in Multicolor with a baby bib! Die cut stitched tags also from some patterned papers along with a sentiment banner from the same critter sheet and ties up with a pink twine.

Here are some close-ups:


Then I started to create my layers on the page with lots of flowers and leaves, clouds, rainbows and all the tiny elements I added on scalloped circles with dimension.

I heat embossed one of the clouds using embossing powder for more dimension and realistic look.


The black banner sentiments are from the same critter sheet and giving depth to the image. Added a text chipboard sentiment Dream and heat embossed in pink glitter for textures.
I like the final result and Hoping you also enjoyed too!


To finish it off I added some of the embellishments from my collection to decorate my layout, like a pom-pom frilled lace, crochet flowers, luxury button, prima flowers, a cute dragonfly and few hearts!
This has been a fun collection to work with!

Happy crafting!

Supply list:

Cardstock: Soft pink sheet; texture pink sheet
Cardboard: Kraft 800 gsm
Corrugated sheet: off-white from Itsy Bitsy
 Foam sheet: White
Acetate sheet: Itsy Bitsy
Pattern Papers: Easter time stripe/ Blue from pebbles inc; Precious Petals from Frances Mayer Inc; Love You Madly Bits & Pieces from Glitz Design
Critter sheets: Bundle of Joy Collection and watercolored Florals from DCAM
Dies: Stitched Scallop circles, Stitched Tag 2, Leaves duo from DCAM
Stamp: Stitches from Bo Bunny
Archival Ink: Jet Black
Distress ink: Picked raspberry, apple red
Clear Embossing Ink: Versamark
Embossing Glitter Powders: Sparkling Snow and Magenta Twinkle from Wow
Chippies: Dream sentiment from Studio Calico
Luxury button: CRAFT sensations
 Flowers: Strawberry Kisses set from Prima
Confetti Sprinklers: Multicolor from DCAM store
Baby steps printed cardboard stickers: Hearts, clouds, rainbow, tiny flower from my stash
Crochet flowers, dragonfly, pom-pom frilled lace in white and pink-silver twine: from my stash
Double sided foam tape,  fabric glue, craft glue
Big Shot