Friday 24 December 2021

Merry + Bright!

 Hello friends!

Happy Saturday!

I hope the magic of Christmas fills every corner of your heart and home with joy — now and always, a very Merry Christmas.

Yay!!! In Top 3!

http://scrappelyst.blogspot.com/2022/01/vinner-av-grublisen-for-desember.html

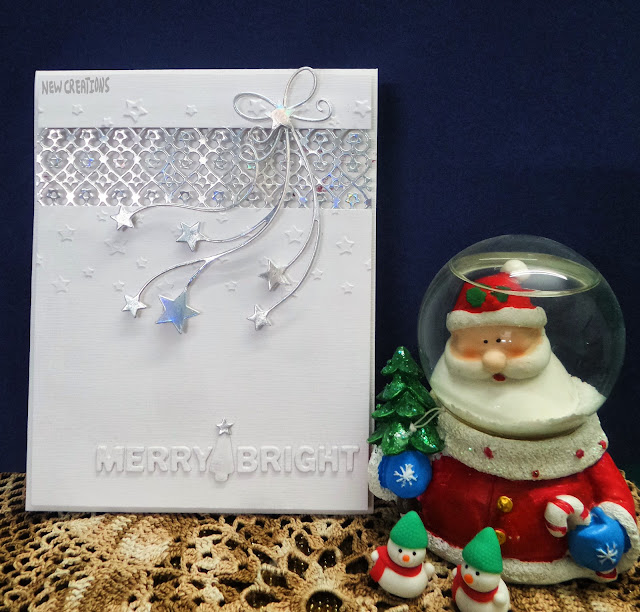
Could this card possibly sparkle and bright any more than this! I had fun with a holographic sheet and made a CAS style card.

Firstly I die cut a white panel and partially embossed it and cut it into two parts.


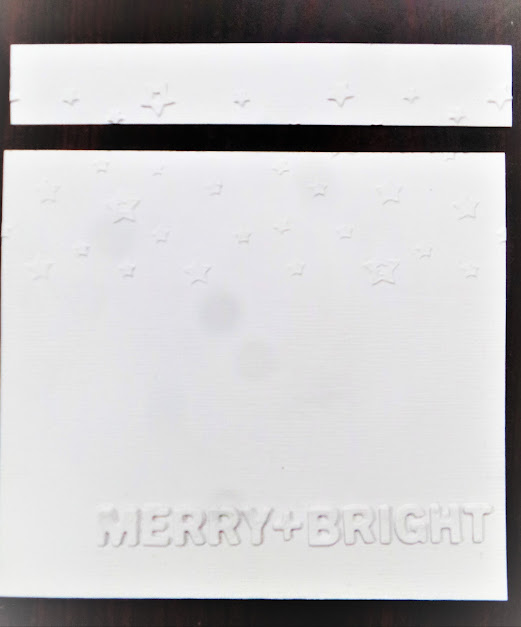
Then added a die-cut sentiment Merry + Bright which is stacked twice for dimension.

Here I am showcasing How I added my die-cut letters in an easy and clean way.:)

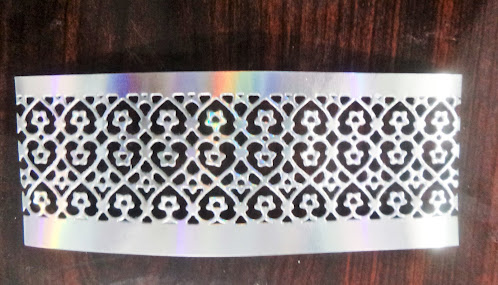
 Then, I started with lacey stars die cut panel for this card for a stylish pattern. I think it looks pretty and intricate with lots of stars.

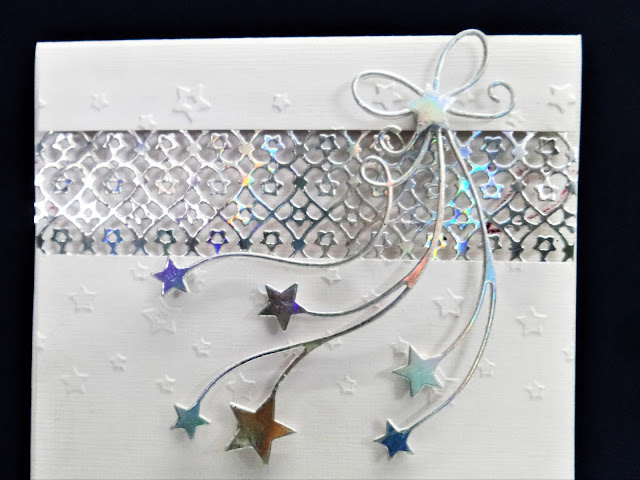
 I complimented it with beloved stars die with a cute bow.

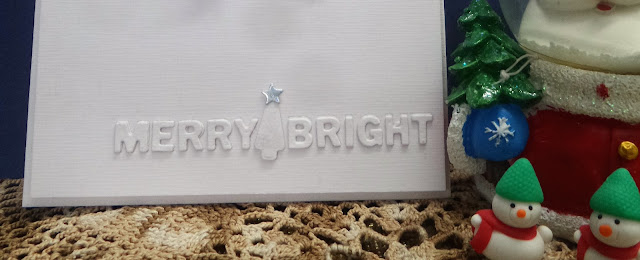
 I couldn't help myself adding a little tree between the sentiment with a tiny star on top of it, that little detail just made it. 

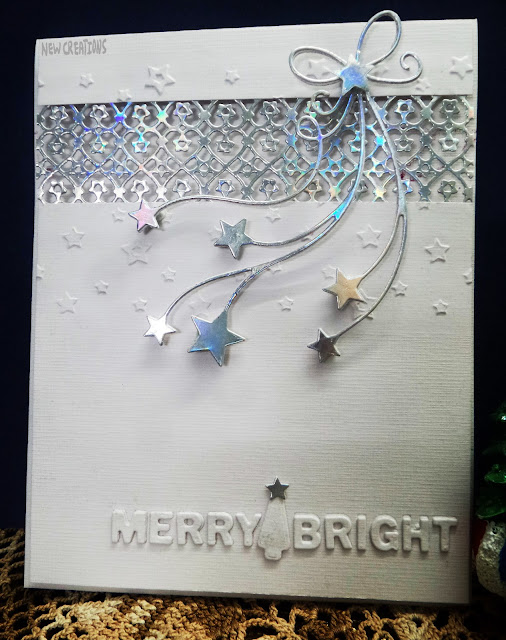
I love the simplicity of the shimmery silver on white with lots of dimension on it! What do you all think!

Happy crafting!

Supply list

Cardstocks: textured white CS

Holographic sheet: Silver from DCAM store

Embossing Folder: Stars from Itsy Bitsy

Dies: beloved stars from Memory box; All in one dies set of 8 from DCAM store; Merry + Bright sentiment from In a word: Holiday dies from Winnie & Walter brand, a small tree from Winnie & Walter

Would love to join these fun challenges:

http://scrappelyst.blogspot.com/2021/12/grublis-for-desember-hvit-som-hovedfarge.html

https://scrapsoflifebyscrappymo.blogspot.com/2021/11/november-rudolph-days-challenge.html

https://letssquashit.blogspot.com/2021/12/challenge-15-any-embossing-folder-any.html- I partially embossed the panel


Blingtastic snowflake on Christmas eve!

Hello friends!

Happy Friday and Merry Christmas eve!!!

On this Christmas eve, I made a fun, elegant and easy jewelled snowflake card using a beautiful snowflake die, a perfect focal point!

 My card is inspired by a Create a Smile mood board!


I took a piece of metallic pearl shimmer CS in baby blue and die a snowflake, just so pretty.
Then I adhered that panel to the white card base.
Using my tweezer I placed each individual pearls and rhinestones....... the tiniest white pearl took a little extra time:). Just beautiful!

A closer view with tiny details:


Embellished it with a white shimmery ribbon bow along with a silver string and some turquoise anklet bells.


I heat embossed the sentiment in the same tone of baby blue pearl sheet with blue pearl EP for tone on tone effect.


Perfect little details on the snowflake! What do you all think? I love the way my Christmas snowflake look now!
Happy and merry day!

Supply list
Cardstock: Glossy white CS from Crafters Corner store
 Metallic Pearl Shimmer CS: Baby blue from DCAM store
Glitter sheet: turquoise blue
Die: Cool cuts Negative Snowflake die from Create a Smile 
Stamp: Snowy/ Holiday set from Winnie & Walter
Adhesive Rhinestones and half pearls: white pearls in different sizes and turquoise blings in different sizes from my stash
Anklet Bells: Turquoise color pack from  Itsy Bitsy store
White Shimmery ribbon from my stash
Silver string from Crafters Corner store

Would love to join these fun challenges:
https://createasmilestamps.blogspot.com/2021/12/we-dare-you-to-create-smile-december_01235051424.html- I am inspired by cool blue color, snowflakes, ribbon bow and some blings


Wednesday 22 December 2021

Warm winter wishes!

 Hello everyone!

Happy Wednesday!

I decided to create a fun winter atmosphere scene card with the blue color theme and followed a sketch!!

I absolutely Love the Holiday Kids collection stamp set which has four different images, perfect for Christmas cards!


Here is the sketch:

I love how these papers work so nicely today!

I stamped the adorable sledge kid image with a cap and colored it with my Zigs. Then fussy cut them. I also added some silver glitter paste to the cap, sledge and muffler for some shimmer.

I used the Country Landscape die twice for a snowy hill. For the sky background, I created some silver glitter snowdrops. 

I finished off the card by adding a die-cut snowflake, added some ice snow with some silver glitter on it for some frost.


Love the sentiment die, perfect for this winter scene!

Happy crafting!

Supply List

Cardstocks: Navy blue CS, smooth white CS

Glitter sheet: Blue

Pattern Paper: foiled circles PP from my stash

Stamp: Holiday Kids Collection from YNS 

Dies: Country Landscape from Memory Box, Snowflake is from Christmas die set of 5 from DMC brand; warm winter wishes sentiment from STAMPlorations

Glitter paste: silver from Stamperia

Archival ink: Cornflower blue

ZIG watercolor Brushes: Peacock Blue and black

Icy Snow Paste from Cadence

Would love to join these fun challenges:

https://de-egel.blogspot.com/2021/12/november-challenge-132.html

http://sirstampalotchallenge.blogspot.com/2021/12/december-choose-theme-and-stamp-it.html

https://girlzcreativecrafts.blogspot.com/2021/12/challenge-20-kerst.html

https://kaartjes-inspiratie-challenges-blog.blogspot.com

https://christmas-craft-creations.blogspot.com/2021/12/december-challenge-make-scene.html


Saturday 18 December 2021

Winter scene on Kraft!

Hello to all!

Happy Sunday!

Imagine, just a week left to celebrate Christmas!

Yayyy! In Top 3!

https://allsortschallenge.blogspot.com/2021/12/good-afternoon-to-you-all-we-hope-you.html

Here I made another card with lots of white and vintage feel on it with some pink Christmas trees and a cute reindeer!


For the winter scene background, I started with a Kraft card base. Embossed a white panel. Die-cut some rectangle scalloped frame, some corrugated winter hills. 


Die-cut a reindeer from a snippet of the textured light brown sheet.


Now created the whole background of the winter scene. Die-cut some Christmas trees from the snippets of an embossed white sheet. and inked some raised parts with neon pink ink.


Added the letters JOY.


Tied a jute twine as a muffler to the reindeer neck.


Embellished it with some semi-transparent iridescent baubles.


Some more pics:


Something different from my style. Hope you all like it!

Enjoy your day and keep crafting!

Supply List

Cardstocks: Kraft textured CS, Smooth white CS, Coconut white CS

Textured sheets: White corrugated sheet, light brown textured sheet, an embossed sheet in white from my stash

Embossing Folder: Swirls and ribbon set from Sizzix

Dies: Winter trees and Reindeer from Dress my craft store; Nested rectangles from Tattered lace; scalloped stitched rectangles from Gina Marie designs; Borders 1 from paper smooches; JOY word- Holiday Tiles cutaways from Winnie & Walter

Neon Ink: Pink

Embellishment: Fortune teller from Trinity Stamps

Glossy accents

Jute twine

Would love to join these fun challenges:

https://letssquashit.blogspot.com/2021/12/challenge-15-any-embossing-folder-any.html


Friday 17 December 2021

Christmas Rainbow

Hello everyone!

Happy  Saturday!

Rainbows are one of my favorite things, so having a rainbow stencil set used for Christmas, just absolutely "makes" Christmas for me! I decided to go with a few traditional colors as well.


I had fun playing with this beautiful sketch this time:


I started by die cutting a ticket stitched panel in white.


I inked all the rows through the rainbow stencil one by one with masking technique as well.

I love metallic as well and it's hard to capture the colors but in real it looks so beautiful, the forest trees and shades of green are metallics here. Stamped the sentiment.


I added my ticket panel according to the sketch designed panel. Added some black dots and stars for more interest in the rainbow design using a black pen. Finished it off with a bow and some tiny stars as sparkles!

A Christmas rainbow....... this made me totally happy! Hope you're doing something that makes you happy today!

Happy crafting!

Supply List

Cardstocks: Ultra smooth white CS from Itsy Bitsy store; Textured red CS

Metallic CS: Deco green

Pattern Paper: Back to basics pad from Papericious

Stencils: Rainbows &clouds, In the forest from Uniko stamps

Stamp: Most wonderful set from Uniko stamps

Dies: Stitched tickets die set from peekaboo Designs; designer bow from Elizabeth dies

Pigment inks: Encore Ultimate metallic teal and Honeydew, Versacolor mint

 Dye Inks: Black licorice from Lawn fawn; Versa color mint,  poppy red and crystal red

Star Sequins: Green from my stash

Would love to join these fun challenges:

https://thesketchychallenges.blogspot.com/2021/12/the-sketchy-challenges-180.html

https://unikostudio.blogspot.com/2021/12/uniko-challenge-reminder-68-celebrate.html


Poinsettia Holiday gift box

Hello everyone!

Happy Friday!

It's time for some Holiday gifts. Let me inspire you with a theme "anything but a card for gift giving"


I started with a pillow box die. I love the foiled print in gold in white with festive vibes.  Die-cut a window for the front part and added an OHP sheet inside. Simply adhered the sides with red tacky tape and the ends simply fold in. 


Created a poinsettia flower by stamping in metallic gold on the snippets of vellum sheet and shaping it.


Die-cut a tiny tag and embossed the sentiment, Tied it with twine.  Filled the box with yummy sweets. Ane wrapped the pillow box with a gorgeous golden ribbon, Added the poinsettia flower and attached the tag.


Glazed it with some adhesive pearls in gold. Tada and done!

Happy crafting!

Supply list
Cardstocks: white CS
Pattern Paper: Foiled Festive vibes from DMC 
Stamps: Poinsettia set from Peekaboo design, sentiment is from Nutcracker kisses set Winnie & Walter brand
Snippets of Vellum sheet
OHP sheet
Dies: Pillow box from X-cut; Wonky rectangles from Spellbinders; Framelits die set tag collection from Sizzix
Embossing powder: Metallic gold rich pale from WOW
clear adhesive dot
Twine in dual shade
adhesive pearls in gold
Gold ribbon
Red tacky tape

Would love to join these fun challenges: