Friday, 13 September 2019

Golden moment!

Hello friends!

I made a quick card using metallic gold as my inspiration. Combined with polka dots, black and gold really make for a timeless look!


I left the top open with white space and add stencilling with gold glitz sparkle for a metallic look.
Then stamped some arrows and sentiment This is the Life. Die-cut Wow moment two times once from metallic gold sheet and one from the black sheet and adhered the moment word on the metallic one. Die-cut an arrow for showing the happy moments through bubbles!


 Adhered the vellum stars using some clear glue drops.

I think it looks fabulous, don't you!
Happy crafting!

Supply list

Cardstock: white CS
Heavy vellum sheet
Pattern Paper: Monochrome from Papericious; Mariposa Metallic glitter DCWV stack
Stamp: Arrow and sentiment both are from Calendar stamp set Kaisecraft
Die:  Wow moment die, Arrow from Heart card die set both are from Technique Tuesday; Pierced stars from Spellbinders
Stencil: Bubbles from Magenta
Sparkle paste: Gold glitz from Itsy Bitsy
Archival Ink: jet black 
glue drops: Fevicol


Tuesday, 10 September 2019

Acrylic Pouring Art Canvases!

Hello friends!
Happy Tuesday!

 I would love to show you how to create easy art using basic acrylic paint pouring techniques in two styles! An easy wat to create abstract art through this medium! My DT post for Itsy Bitsy!


Have you seen those crafty paint pouring videos popping up at Itsy Bitsy Instagram and Itsy Bitsy Crafter Cafe FB page? I 've been seeing them everywhere and I can bet Acrylic Pouring Art is just so much fun!
If you are yet to try it, you are in for a real treat!  Let's get started, shall we?

First, you will need to collect all the supplies and prepare your workspace.


Acrylic Pouring can be a messy process and paint will run off the canvas so take precaution to protect your work surface and floor. I used some newspapers, plastic sheet, and also used a circular stand to catch the bulk of the paint runoff and it was also helpful to lift my canvas.

Workspace supplies
  • Newspapers, paper towels, plastic sheet 
  • plastic cups/glasses to pour your acrylic colors
  • Gloves
  • any type of stand to lift up your canvas
  • icecream sticks or any other type of sticks to mix up the colors and medium
Painting Supplies
  • Canvas
  • Acrylic pour paint
  • Acrylic Pouring Medium
  • A Thin Plastic sheet for the technique
Now let's mix our paint!
Tip and technique: Successful fluid art is all about paint consistency. The pouring recipe I prefer 1 part acrylic paint and 2 parts acrylic pouring medium mean 1:2 ratio. You can go ahead and experiment according to your choice. It doesn't matter whether you add the paint first or the medium first, but it does matter how well you mix it. It is also important when you mix your paint to stir and not whip. Whipping created air bubbles. And let the mix stir sit for at least 15 to 20 minutes for better results.
Now the paint is free of air bubbles. Its time to load the cup. 

Flip the cup Technique No. 1

My first technique will be flip the cup.
 There are no rules when layering your colors in the cup but typically white go in first since it pulls down through other colors. 
I would suggest starting with only 2 or 3 colors for the newbies.


 While you wait for the color to sink to the bottom, add a thin layer of white paint mix to the canvas all around the cup as shown in the pic. Spread it using a brush or spatula. This will help the colors flow and spread on the canvas after the cup is lifted.


Once the cup is loaded, set the canvas on top and flip over the cup and canvas together.


It's always a surprise to see what pattern is going to form when the cup is pulled away and the paint begins to spread.


At this point, you can pick up the canvas and gently tilt the canvas to help the paint spread. 

                          Be careful though, if you tilt it too fast the paint might fall off.

 Once the paint has covered the canvas to your liking, set the painting on a level surface to dry. It takes between 1 to 3 days for a painting to be dry to the touch. When the painting is fully cured, the resin can be used to bring the colors out and gave the painting a beautiful glossy finish!


Here is my final outcome! I am pleased to see a magical creature appear in my painting...... Can you find it????

Yes!!!! It's a Unicorn!


Now time for another canvas, I could not stop myself for another experiment!

Reverse Flower Dip with Circles Technique No. 2

It means you can easily convert the circles to flower using a thin plastic sheet!
Let me show the steps.
First I covered my entire canvas with black Acrylic paint. Start from the middle point of the canvas.


In the excitement, I forgot to take a pic of my pouring colors in the cups.
For this technique, it is essential that the colours are of a thicker tendency.


I poured the colors one by one in a circular shape as shown in the pics.


Now carefully cover the canvas with a plastic sheet without creating air bubbles.
And spread the circles slowly with the help of your finger in circular shape to merge the colors properly.
Now slowly lift all the corners of the plastic sheet one by one towards the centre and then completely remove it from the centre carefully.


I was so surprised to see those circles converting into a beautiful flower just with the help of a plastic sheet. It is called Reverse flower dip technique, so easy! And every time you will get a different pattern!


And then with the help of 0 no. paintbrush, I gave it more definition of a flower to create more clear petals.


Have a close look at the middle part of the flower in yellow with blue petals!


I totally love this black beauty,  love the beautiful cells, don't you! I think I could play with these pouring art all day just to experience the different outcomes and color combos.

I really do hope you' ll give pouring art a try, it's crazy fun and inspired you to take part in our ongoing month challenge!

For more fun watch me on Youtube channel!
https://www.youtube.com/watch?v=CNm2o9yCG24&feature=youtu.be


Have a messy pouring day!

All Supply Listed from Itsy Bitsy

Artistic Canvas PanelsCanvas
Acrylic Pouring Paints: Pearl white, timeless Teal, pearl white, pastel pink, pineapple crush, rainforest, grassy green, plum orchid,
Wooden craft soon, plastic cups,
Paint Pouring Medium

Participating in these challenges:
http://scrappelyst.blogspot.com/2019/09/utfordring-for-september-knalle-farger.html








Monday, 9 September 2019

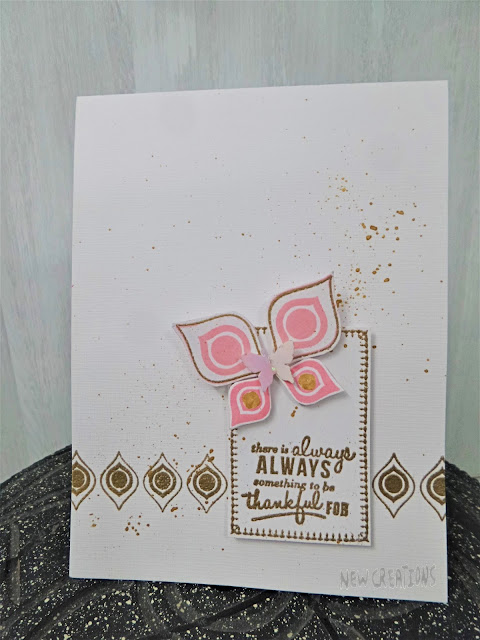
Less is more - Metallic butterfly!

Hello friends!

A little something with a pattern builder!
 I have created a clean and simple card focussing a pattern builder set. The butterfly..........!


First up I started with stamping a label frame with a sentiment using my Misti and heat embossed it in metallic gold and fussy cut it.
Then I created a border strip across a white card front again in metallic gold using same pattern builder stamp set.
Embellished the corner of the label using same pattern builder, inked it and made a pretty butterfly, attached a shimmery butterfly sequin and finished it off with some splatters using Inka gold.


I love the metallic results on it!
I hope you enjoyed what I shared with you today!

Supply List

Cardstock: Textured white CS
Stamps: Pattern builders from Mudra; from Kaiserkraft
Altenew Inks: cotton candy, frosty pink
Embossing powders: Metallic gold rich pale from Wow
Sequin: Metallic shimmery Butterfly
Inka gold: old gold

I am inspired by these challenges:
http://simplylessismoore.blogspot.com/2019/08/challenge-403-metallics.html

Sunday, 8 September 2019

Let's celebrate!

Hello friends!
Hoping you all are enjoying your weekend!

Today I want to share a card featuring Metropolis stamp combined with cross-stitching with a summer feel on it with clouds.


Basically, I started by a white panel punching all the holes using single hole die only😊 from YNS set ( I don't own cross stitch die actually), so I can use it as a cross-stitch grid for a fun background.


Then stamped the Metropolis image onto the grid in grey ink at the bottom and clouds at the top corner later on. Then I embroidered it using wools in rainbow color to fill the colors in buildings.
Now I embroidered the rest of the blank space with white.


I outlined the image with black wool for more details.


Then I placed my sequins with seed beads to fill up the clouds in blue color.
Adhered that panel with foam dots on my card base. The sentiment is from the same set and I added some colorful stripe PP to match my design.

I just love love love the way it turned out!

Supply List

Cardstocks: white, black and shimmery light blue CS from DCWV stack
Pattern Paper: Snap life from Simple stories paper stack
Stamp: Metropolis from Paper smooches
Die: Stitched holes from YNS
Wools: red, pink, yellow, raspberry, blue, dark blue, light green
Sequins: From Die cuts and more
Archival inks: Jet black and shadow grey
foam dots
beads

 These challenges inspired me to participate here:
https://craftymilka.blogspot.com/2019/08/ilovemathchallenge14.html- grids with cross-stitch

http://timeoutchallenges.blogspot.com/2019/08/challenge-143_29.html

Friday, 6 September 2019

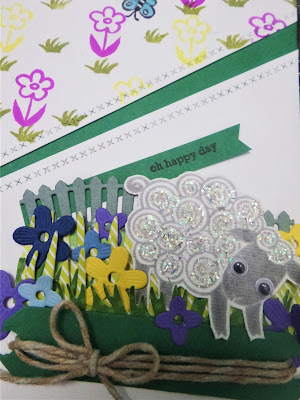
Farm friend!

Hello

A cheerful farm friend card, a cute little lamb, just adorable!


I love creating little scenes on my cards!
I really love how cute she is. I just needed to add a bit of background for her to stand in the farm.


Behind her some fence, wild grass to give some dimension to the scene with some flowers. Adhered googly eyes and some tinsel dust to her body. Added a triangle panel with my own stamping background feeling of the summer! 


Supply list
Cardstock: White fleece textured CS, white CS, sap green CS, grey CS
Pattern paper: Pretty basics from papericious
Stamp: Cute Animals from Itsy Bitsy
Dies: Grassy Edges from Die-namics, Fence from Die cuts and more, Stitched borders from Lawn Fawn, Tag from Sizzix
Archival ink: Fern green
Dye inks: Jet black, turquoise, magenta, lemon yellow
Tinsel Dust: from Die cuts and more
Jute string

Monday, 2 September 2019

You are stuck with me!

Hello and Happy summer!

To Kick off the summer, I played with some of my beloved supplies and made a cacti shaker card for current Freshly made sketch challenge here! This is my second post for the challenge!


Firstly I chose my coordinating PP. Created a dry embossed sunrays background to create my window for the shaker using a sunray stencil.


The cute cactus die image colored with ZIG brush markers. The shaker portion of the card using die along with a mix of sequins, tiny stars and seed beads.


I added a strip of cacti cuteness washi tape across the bottom. I adhered the sentiment on a black strip and used these shaker elements as an accent too.

Here is a close up look at the shaker portion of the card.


It offered a fresh and sweet card where the elements in real wood gave an authentic look and the shaker window with embossed sunrays energizes the whole thing!


Happy crafting!

Supply List
Cardstocks: Textured white CS, black CS
Pattern Paper: Succulent  and Textured Brew paper stacks from Itsy Bitsy
Dies: Pierced squares from Sizzix, Preety cacti from Itsy Bitsy
Stencil: Sunburst from Craftyscrappers
Shaker Elements from Itsy Bitsy


Sunday, 1 September 2019

Masculine Birthday card

Hello
Happy Sunday!

A Masculine Birthday card!
Congrats on celebrating the 400 sketch challenge Freshly Made Sketches, a great milestone!
Love this fun sketch and I am playing first time here:)
Here is my rendition!


Love the floral wreath die from sizzix with so many cute elements and I choose a bird. I used the PP as the inspiration for my card and negative use of the bird die.


A stamped greeting banner added on a jute string with some water droplets to highlight the PP more!
Added a tiny gem for bird-eye! That's all!
Hope you like it!

Supply List
Cardstocks: White, turquoise blue CS
Pattern paper: Aqua Medley from Itsy Bitsy
Stamp: Greeting Bulletin from Itsy Bitsy
Dies: Pierced squares from Spellbinders; Floral wreath( bird) from Sizzix thinlits die set
Archival ink: Jet Black
Jute string